
Oh, you know how sometimes you just crave that perfect, decadent dessert but your tummy does a little flip-flop thinking about the sugar or gluten? I totally get it! That was me a few years back. When I was diagnosed with celiac disease in 2017, I felt like I had to say goodbye to so many of my favorite treats. But you know what? That challenge just sparked a fire in me! My culinary journey took a whole new turn, and I became obsessed with finding ways to recreate those classic flavors we all love, but in a way that felt good for my body. That’s how my discovery of the incredible Tiramisu Chia Pudding came about. It’s this magical blend of creamy, coffee-kissed goodness that tastes *exactly* like the real deal, but it’s packed with healthy fats and fiber from chia seeds. Trust me, this recipe is a game-changer and a testament to how we can still honor our favorite Italian flavors while being kind to ourselves.
Why You’ll Love This Tiramisu Chia Pudding
Seriously, you are going to adore this Tiramisu Chia Pudding! It’s one of those recipes that makes you feel like you’re totally spoiling yourself, but you’re actually giving your body a hug. Here’s why it’s become a staple in my kitchen:
- Healthy Indulgence: It’s packed with fiber and omega-3s from chia seeds, making it a guilt-free way to satisfy those sweet cravings.
- Totally Gluten-Free: Yep, you get all that tiramisu goodness without a hint of gluten. Perfect for anyone avoiding it!
- Super Simple to Whip Up: Honestly, it takes hardly any time at all. Just a bit of whisking and chilling, and you’re golden.
- Amazing Flavor & Texture: It’s got that rich, creamy mascarpone vibe and coffee kick you expect, but with a delightful chia pudding texture.
- Dietary Dream: It’s naturally vegan, dairy-free, and can easily be made lower in sugar, so it fits a whole bunch of different lifestyles.
Gather Your Ingredients for Tiramisu Chia Pudding
Alright, let’s get down to business! Here’s everything you’ll need to whip up this gorgeous Tiramisu Chia Pudding. Don’t worry, it’s all pretty straightforward, and I’ll break it down for you so it’s super easy.
For the Chia Cream
This is the base of our pudding, the part that gets nice and thick and holds all those dreamy flavors.
- 400 ml Plant-based milk (I love almond, cashew, or even vanilla soy for this!)
- 6 tbsp Chia seeds (these little guys are magic!)
- 1 tsp Vanilla powder or a good natural extract (don’t skimp here!)
- 2-3 tbsp Maple syrup (or your favorite natural sweetener, adjust to your taste!)
For the Creamy Layer (Mascarpone Style)
This is where we get that luscious, rich, almost-like-mascarpone texture that makes tiramisu, well, tiramisu!
- 200 g Plain plant-based yogurt (coconut or soy work wonderfully for creaminess)
- 100 g Silken tofu or soaked cashews (this makes it super smooth and rich)
- 1 tbsp Maple syrup (just a touch of sweetness here)
- 1 tsp Lemon juice (this really wakes up the flavors and balances things out!)
For the Soaked “Biscuit” Base
This is our nod to the traditional ladyfingers, but we’re doing it the healthy, gluten-free way!
- 100 ml Strong coffee (espresso is amazing, but good instant coffee works too!)
- 1 tbsp Maple syrup (to sweeten that coffee just right)
- Gluten-free biscuits or homemade cake cubes (think something like a light banana bread or plain cake – just make sure it holds up!)
For Finishing Touches
The final flourish that really makes it look and taste like the real deal.
- 1-2 tbsp Unsweetened cocoa powder (raw is great if you have it!)
- Optional toppings: Dark chocolate shavings, a few extra chia seeds, a bit of orange zest, or some fresh berries! Get creative!
Equipment Needed for Your Tiramisu Chia Pudding
Alright, let’s talk tools! You won’t need a whole fancy kitchen for this Tiramisu Chia Pudding. Grab a few everyday things, and you’ll be well on your way to dessert heaven. Here’s what I’ve found works best:
- A Good Large Bowl: For mixing up that chia pudding base.
- A Whisk: Essential for getting those chia seeds mixed in smoothly without clumps.
- A Blender: This is key for getting that super creamy, airy “mascarpone-style” layer.
- Serving Glasses (Verrines): Little glasses or jars make this dessert look extra special, just like in a cafe!
- A Fine-Mesh Sieve: Perfect for dusting that beautiful cocoa powder on top without any clumps.
Step-by-Step Guide to Making Tiramisu Chia Pudding
Alright, get ready to actually make this heavenly Tiramisu Chia Pudding! It might look fancy, but trust me, it’s totally doable and so satisfying. We’re going to build this deliciousness layer by layer, just like a little Italian masterpiece.
-
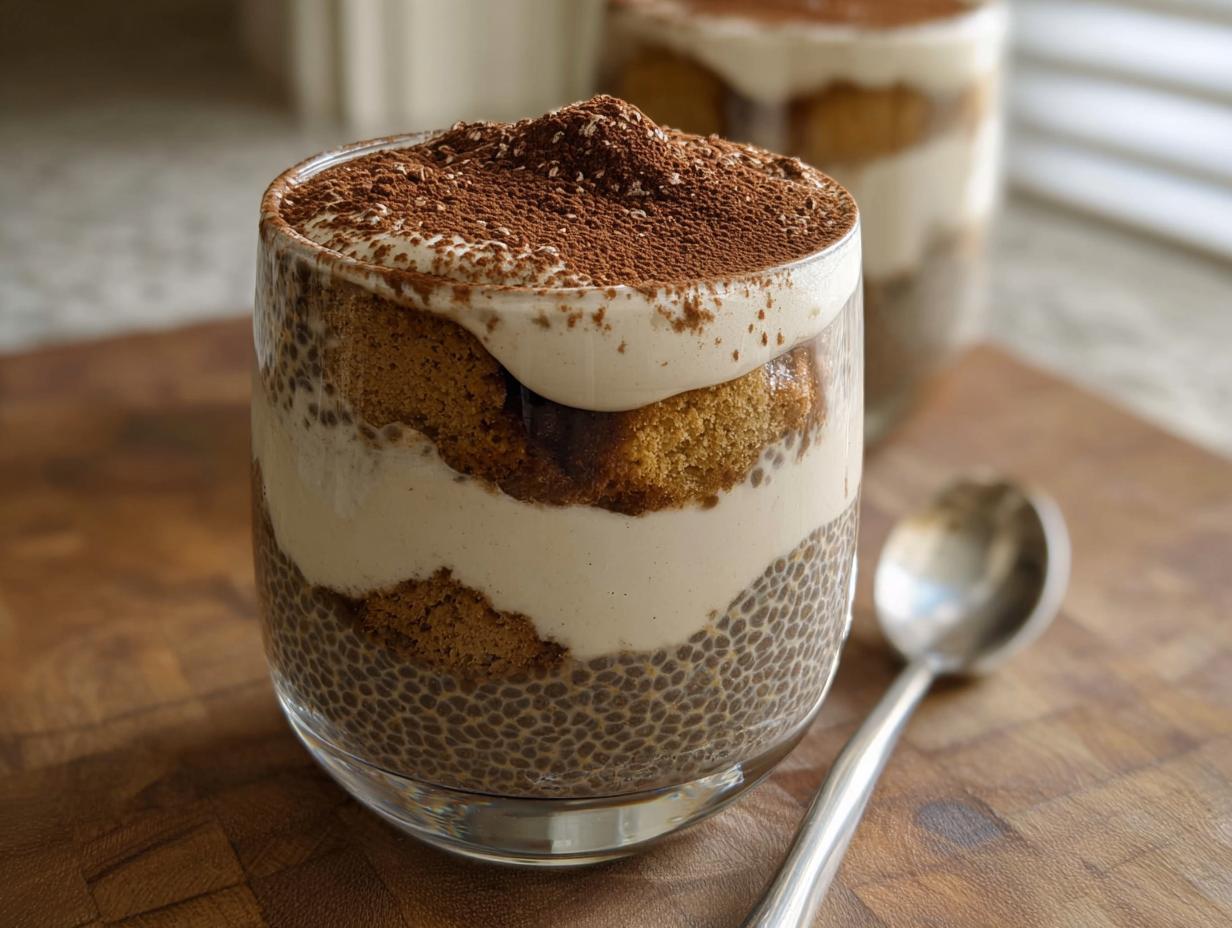
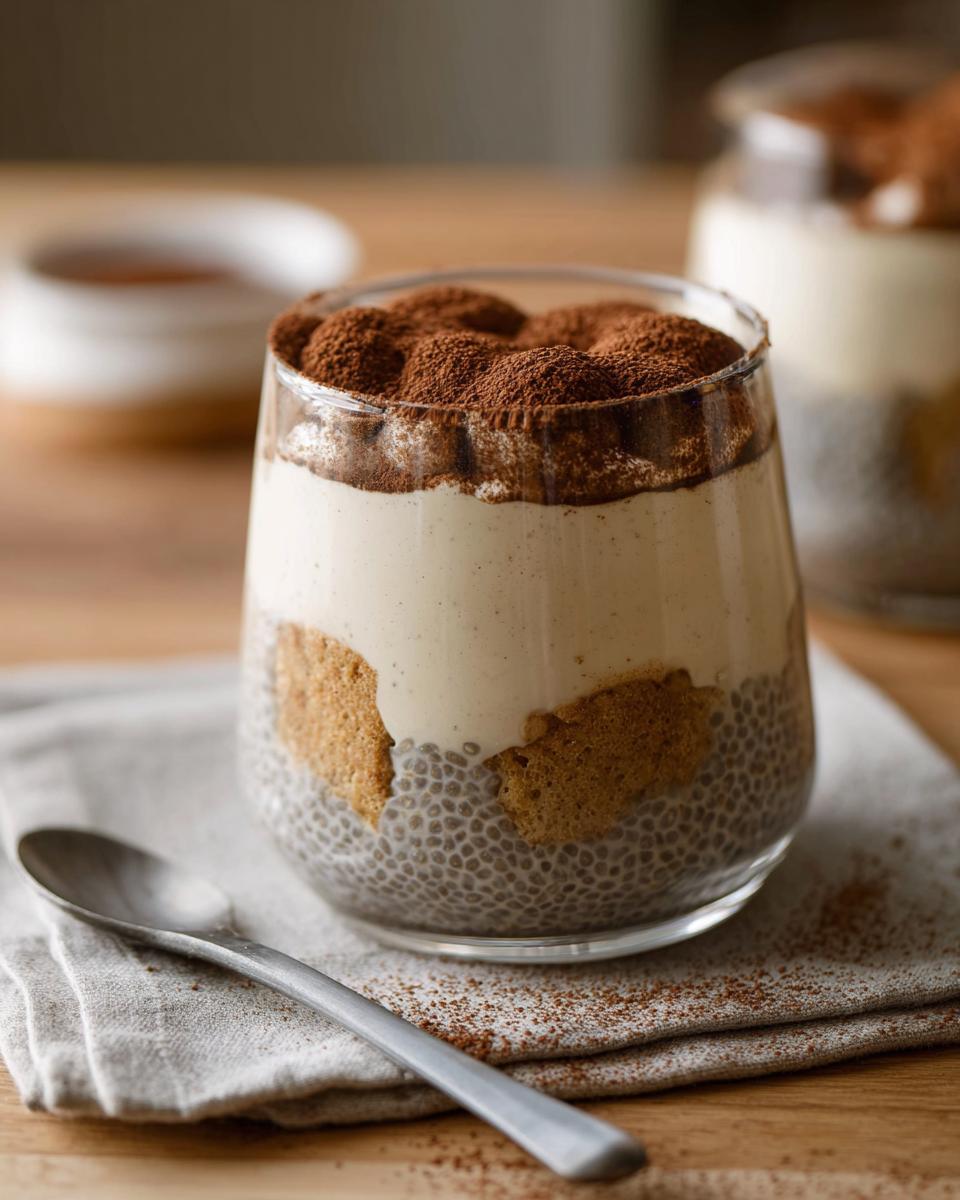
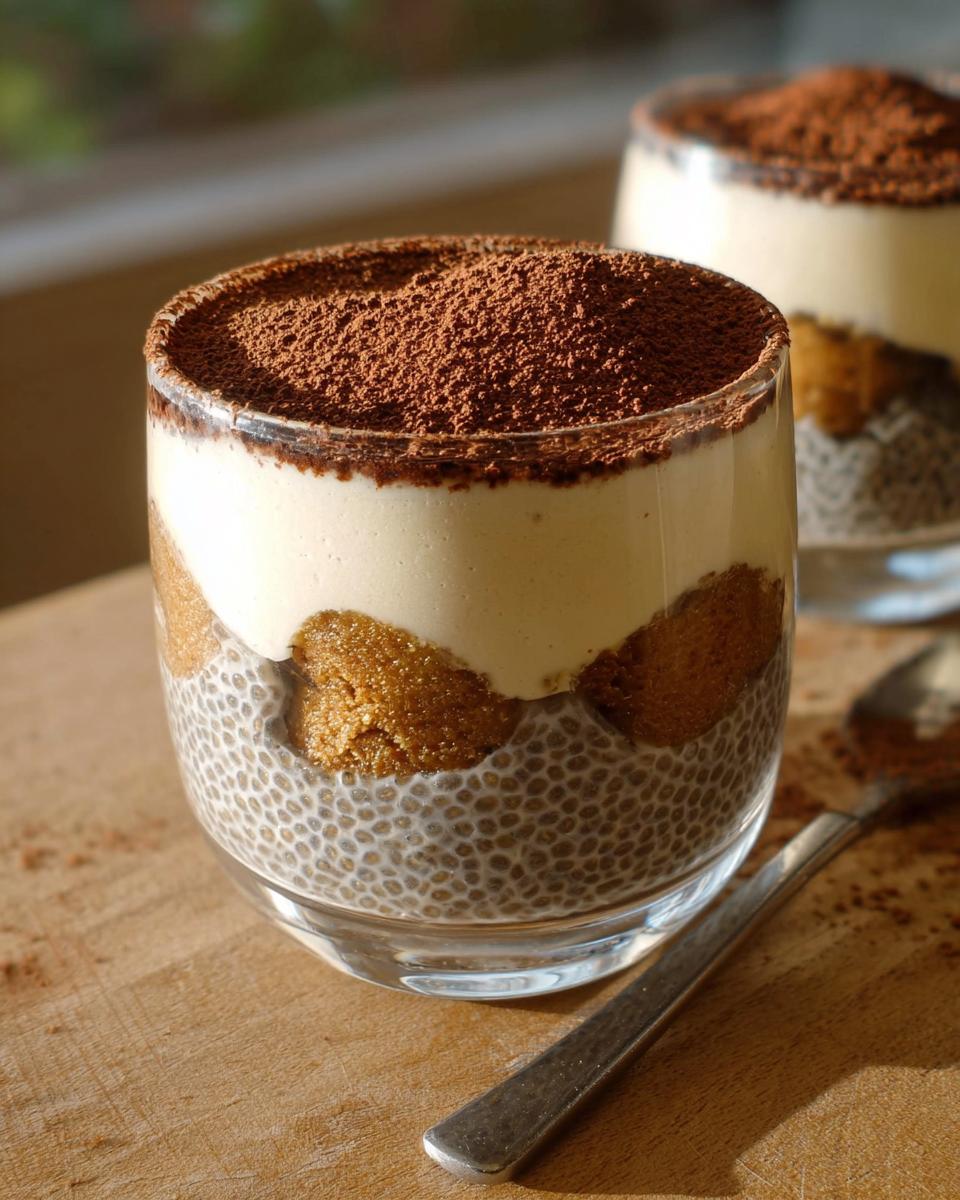
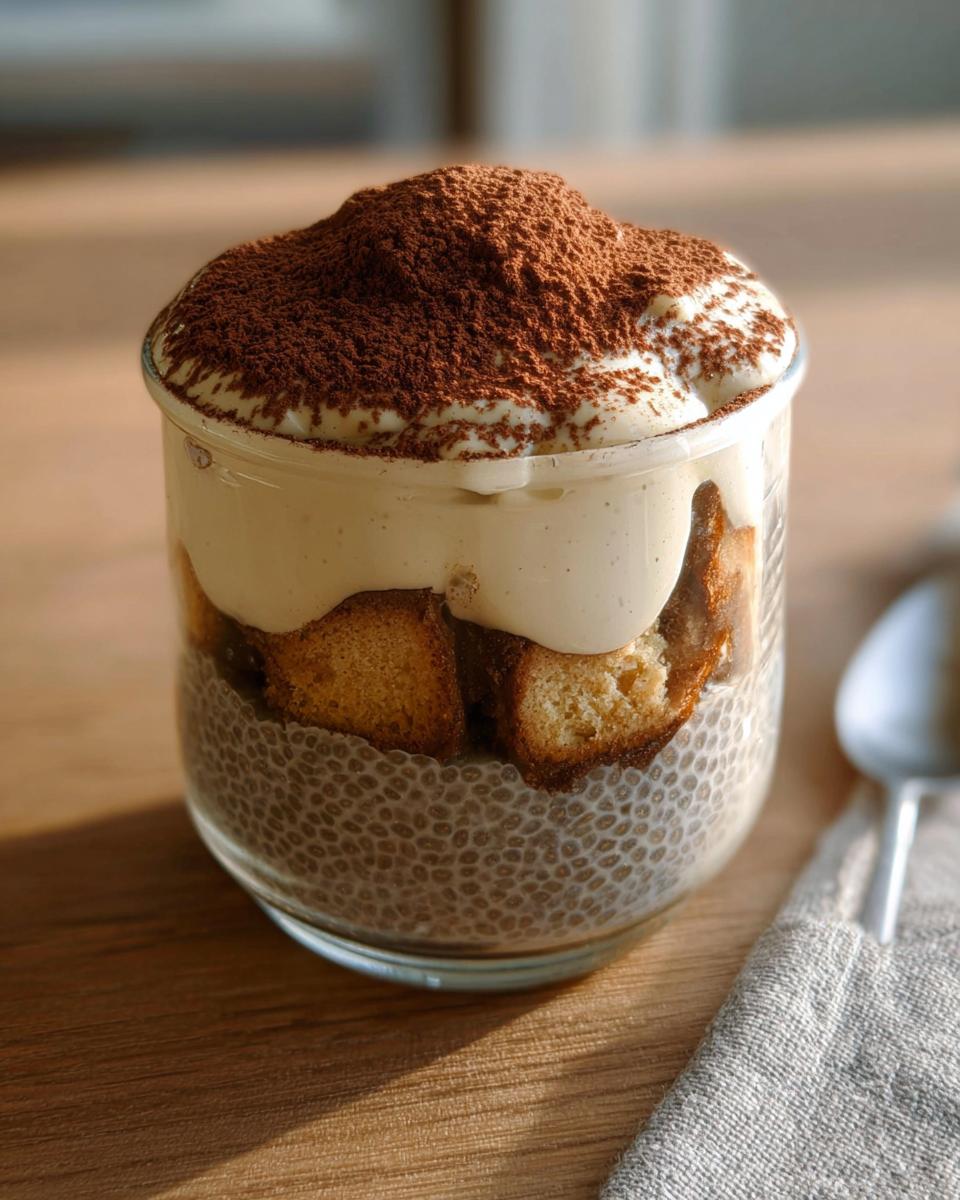
First up, the chia pudding base: Grab a large bowl – a good sturdy one is best. Pour in your plant-based milk, then sprinkle in those amazing chia seeds, that little bit of vanilla, and your maple syrup. Give it a really good whisk to make sure there are no clumps. Now, here’s a little trick Chef Maria taught me: let it sit for about 10 minutes, and then give it *another* good whisk. This second whisk is key to getting that super smooth, pudding-like texture. After that, pop it in the fridge for at least 3 to 4 hours, or even overnight, until it’s thick and lovely.
-
Time for that creamy “mascarpone” layer: This is what gives it that decadent feel! Into your blender goes the plant-based yogurt, the silken tofu (or those soaked cashews if you used them), another tablespoon of maple syrup, and that hint of lemon juice. Blend it all up until it’s perfectly smooth. You want it thick and airy, kind of like whipped cream but richer. Set this aside for now – it’s going to be our luscious middle layer.
-
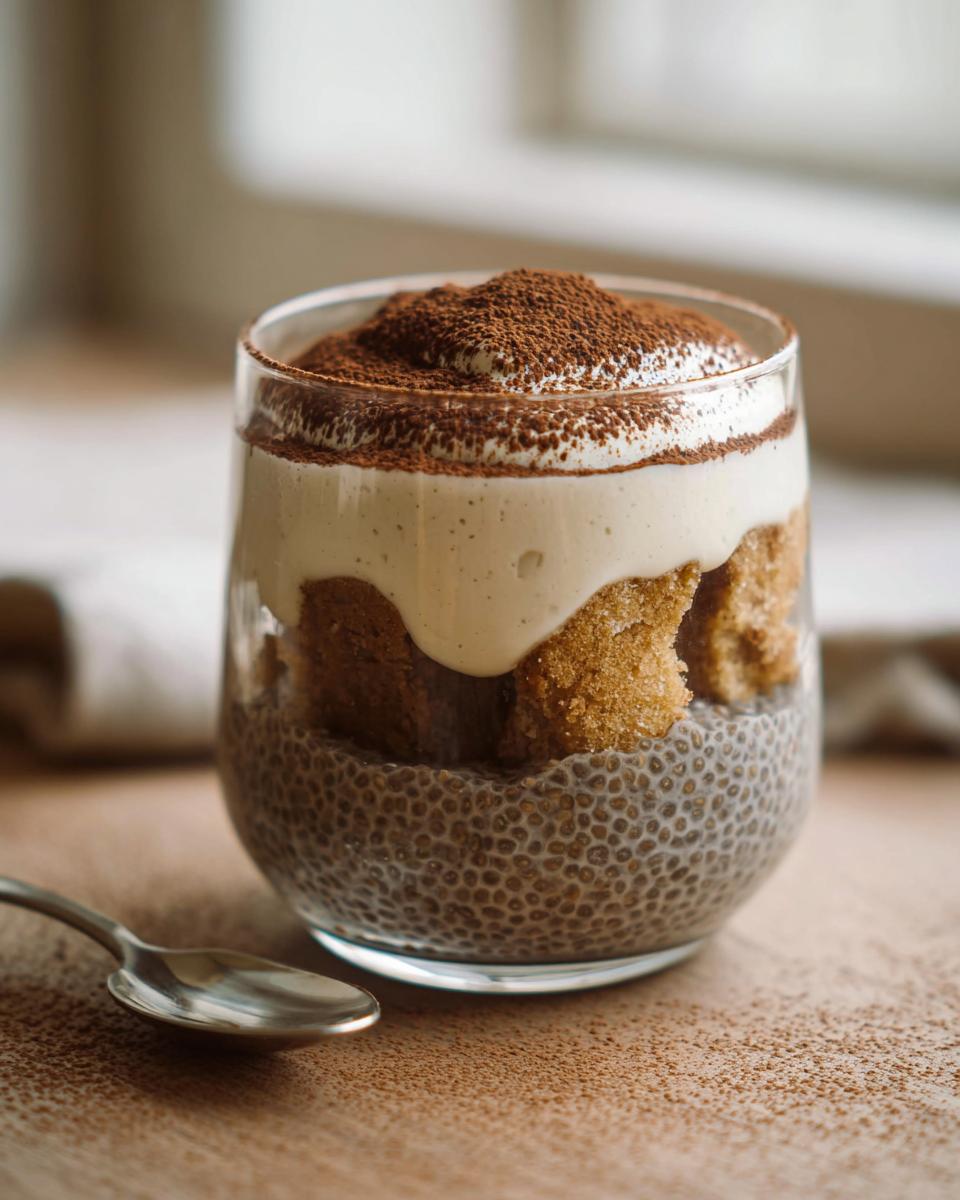
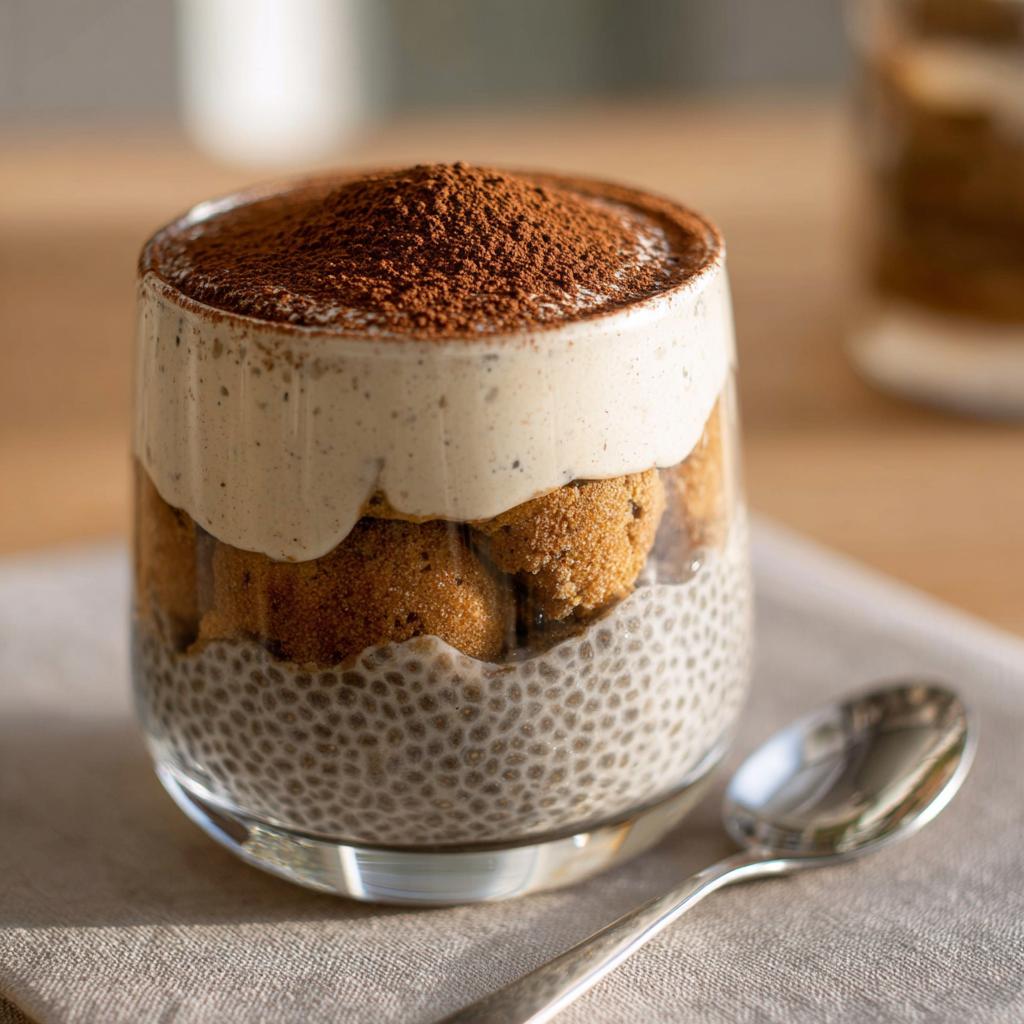
Let’s get those “biscuits” ready: Brew up your strong coffee – I love using espresso if I have it, but a really good instant coffee works too! Stir in that tablespoon of maple syrup to sweeten it just a touch. Now, grab your gluten-free biscuits or cake cubes. You want to dip them *really* quickly into the coffee. Don’t let them soak too long, or they’ll fall apart! We just want them moist, not soggy. Arrange these yummy coffee-dipped pieces at the bottom of your verrines or serving glasses. This is going to be our flavor foundation.
-
Now we build! Spoon a layer of our thick chia pudding right on top of those coffee-soaked biscuit bits. Then, ladle in a generous amount of that creamy, mascarpone-style layer you made. Smooth the top of that layer gently with the back of your spoon. You’re creating these beautiful layers, and it’s starting to look just like real tiramisu!
-
The grand finale: Take your sieve and dust a nice, even layer of unsweetened cocoa powder all over the top. This is that classic tiramisu finish that makes it instantly recognizable and oh-so-chocolatey. Be generous here – you can always brush off any excess if you go too wild!
-
The crucial chill! This Tiramisu Chia Pudding NEEDS a good chill to let all those flavors meld together and for the pudding to set up perfectly. Pop your creations back into the fridge for at least another hour, but honestly, 4 hours is even better. This step is super important for the texture and taste to really shine. You can find more yummy chia pudding ideas over at this recipe, too!
And there you have it! Your beautiful, healthier Tiramisu Chia Pudding is ready to impress. For another take on this classic flavor, check out this version!
Tips for Perfect Tiramisu Chia Pudding
Making this Tiramisu Chia Pudding is pretty forgiving, but a few little tricks can really elevate it from good to absolutely stunning. You want that perfect creamy texture and deep flavor, right? So, lean in, because here are my absolute favorite tips!
Get Your Chia Pudding Consistency Just Right
The biggest thing with chia pudding is getting that nice, thick, jelly-like texture. My biggest tip? Don’t skip that second whisking! Seriously, after you mix everything and let it sit for 10 minutes, give it another good stir. This breaks up any little clumps that might be forming and ensures a super smooth pudding later. If you’re in a rush, you *can* use a bit more chia seed, but I find the flavor is best when it’s not *too* dense.
Layering Like a Pro
When you’re building your Tiramisu Chia Pudding, try to keep the layers as even as possible. Think of it like painting! For the coffee-dipped biscuit base, make sure you have a nice, even layer at the bottom. Then spoon the chia pudding and then the creamy layer on top. A little tap on the counter for each layer can help settle things and make for prettier lines.
Don’t Fear the Coffee!
When you’re dipping your gluten-free biscuits or cake cubes, you want them moist but not falling apart. A quick dip is all they need! If they get too soggy, your layers can get messy. On the flip side, don’t worry too much about a little coffee liquid. It adds to that authentic tiramisu flavor!
Taste and Adjust!
My kitchen is all about tasting as you go. Before you assemble everything, give a little dab of your chia pudding and your creamy layer a taste. Does it need a touch more maple syrup? A squeeze more lemon in the cream to balance it? This is *your* dessert, so make it taste exactly how you love it!
Ingredient Notes and Substitutions for Tiramisu Chia Pudding
Okay, let’s chat about the ingredients for this divine Tiramisu Chia Pudding! Sometimes you might not have exactly what’s listed, or you might be looking for a little tweak. No worries! I’ve got you covered with some tips and swaps that work like a charm.
Plant-Based Milks and Yogurts
I’ve suggested almond, cashew, or vanilla soy milk for the chia pudding base, and coconut or soy yogurt for the creamy layer. These give a wonderful richness. But honestly? Feel free to use your favorite! Oat milk is lovely, or even a hemp milk. Just make sure it’s unsweetened if you’re using a flavored plant milk, so you can control the sweetness yourself. The key is a creamy, neutral base!
Sweeteners: Maple Syrup and Beyond
Maple syrup offers that lovely natural sweetness and a hint of caramel, which is perfect here. But if you don’t have it, agave nectar works beautifully. A date paste also adds a lovely depth. For the “mascarpone” layer, you might want something a little less distinct, so you could even try a little liquid stevia if you’re watching sugar intake closely, just a drop or two!
The “Biscuit” Base Choices
The gluten-free biscuits or cake cubes are your playground! I love a light, slightly sweet gluten-free cookie or even some leftover banana bread cubes. The goal is something that can soak up that coffee flavor without turning into mush. If you’re feeling extra ambitious, you could even bake up some simple, slightly dense gluten-free cookies just for this purpose!
Coffee Strength
For the coffee, strong is definitely the way to go. It really gives that classic tiramisu punch! If you’re not a coffee lover, you could try a decaf espresso or even a strong chicory “coffee” blend for a different, yet still delicious, flavor profile.
Serving and Storing Your Tiramisu Chia Pudding
Okay, the moment of truth! For the best Tiramisu Chia Pudding experience, make sure it’s had at least that 4-hour chill time. This really lets everything meld together beautifully. Serve it up in those cute little glasses or verrines you used for layering – it just makes it feel extra special! If you happen to have any leftovers (which is rare in my house!), just pop an airtight lid or some plastic wrap right over the top of the glass. It stays lovely in the fridge for about 2-3 days, though the texture might get a tad softer over time. But honestly, it’s so good you’ll want to eat it all right away!
Frequently Asked Questions about Tiramisu Chia Pudding
Got questions about my amazing Tiramisu Chia Pudding? I totally get it! It’s a bit different from the classic, but that’s what makes it so special. Let’s clear up any little doubts you might have so you can jump right into making this delightful treat!
Is Tiramisu Chia Pudding healthy?
Oh, absolutely! This version is way healthier than traditional tiramisu which can be loaded with refined sugar and heavy cream. Chia seeds are nutritional powerhouses – they’re packed with fiber, omega-3 fatty acids, and antioxidants. Plus, by using plant-based milks and yogurts, and natural sweeteners like maple syrup, we’ve cut down on the ‘not-so-good-for-you’ stuff. It’s a fantastic way to enjoy a dessert that actually nourishes you!
Can I make Tiramisu Chia Pudding ahead of time?
Yes, you totally can, and I actually recommend it! The magic of chia pudding happens as it sits and chills. Making it ahead of time allows the chia seeds to fully plump up and create that lovely, thick texture, and it gives all those delicious tiramisu flavors a chance to meld together beautifully. I usually make mine the night before or at least 4 hours in advance. It’s perfect for meal prep or getting dessert ready for guests when you know you’ll be busy!
What are the benefits of chia seeds in this recipe?
Chia seeds are the real stars here! They’re amazing for digestion because of their high fiber content, which helps keep you feeling full and satisfied. They’re also a great source of plant-based omega-3 fatty acids, which are fantastic for brain health and reducing inflammation. Plus, they absorb liquid to create that wonderful pudding texture, making this dessert both delicious and incredibly good for you! You can read more about creating specialized meal plans, like a gluten-free diabetic meal plan, for more healthy eating inspiration.
How do I prevent my chia pudding from being clumpy?
Clumpy chia pudding is the worst, right? The absolute key is that double-whisking technique! First, mix all your chia pudding ingredients really well. Then, let it sit for about 10 minutes, and give it *another* thorough whisk. This second step is crucial – it breaks up any seeds that might be starting to stick together. Also, make sure your plant-based milk is at room temperature or slightly warm if possible, as it helps the seeds disperse better.
Nutritional Information for Tiramisu Chia Pudding
Now, while I’m all about deliciousness and feeling good, it’s good to have an idea of what’s in your amazing Tiramisu Chia Pudding, right? Please keep in mind these are just estimates because brands and exact measurements can change things up a bit. We’re looking at roughly around 300-350 calories per serving, with a good mix of healthy fats, fiber, and plant-based protein. It’s a treat you can truly feel great about enjoying!
Tiramisu Chia Pudding
Ingredients
Equipment
Method
- Pour the plant-based milk into a large bowl. Add the chia seeds, vanilla, and maple syrup. Whisk well, let sit for 10 minutes, whisk again, and refrigerate for 3 to 4 hours until pudding-like.
- In a blender, combine the plant-based yogurt, silken tofu (or cashews), maple syrup, and lemon juice. Blend until you have a smooth, thick, yet airy cream. Set aside.
- Prepare the strong coffee and stir in the maple syrup. Quickly dip your biscuit pieces into the coffee, ensuring they don’t get too soggy. Arrange them at the bottom of each serving glass.
- Add a layer of the chia pudding, followed by a layer of the plant-based cream. Smooth the surface.
- Sprinkle the sifted cocoa powder on top.
- Chill for at least 1 hour before serving, ideally 4 hours.