
Okay, let’s talk dessert. You know those moments when you’re craving something rich and chocolaty, something that feels like a total indulgence, but you also want to make a *slightly* healthier choice? I totally get it! That’s exactly how I felt one lazy Sunday afternoon when I had a couple of overripe bananas staring me down and a serious hankering for chocolate. Instead of my usual brownies, I started thinking, “What if I could get that classic brownie vibe but with a banana bread twist?” It felt like pure play in the kitchen, and when I finally pulled out these delightful Healthy No-Bake Oreo Cheesecake Bites, I knew I’d struck gold! They’re so easy and absolutely delicious, proving that a little kitchen creativity can lead to the most wonderfully simple, guilt-free treats. Trust me, these bites are going to become your new go-to!
Why You’ll Love These Healthy No-Bake Oreo Cheesecake Bites
Honestly, why wouldn’t you love these little bites of heaven? They’re a total game-changer:
- Super Easy to Make: Seriously, no oven required! Just a few simple steps and you’ve got a decadent dessert ready to impress. Perfect for when you’re short on time but still want something special.
- Guilt-Free Indulgence: We’ve managed to pack in all that yummy Oreo cheesecake flavor while keeping it a bit lighter. It’s the perfect sweet treat you can feel good about enjoying.
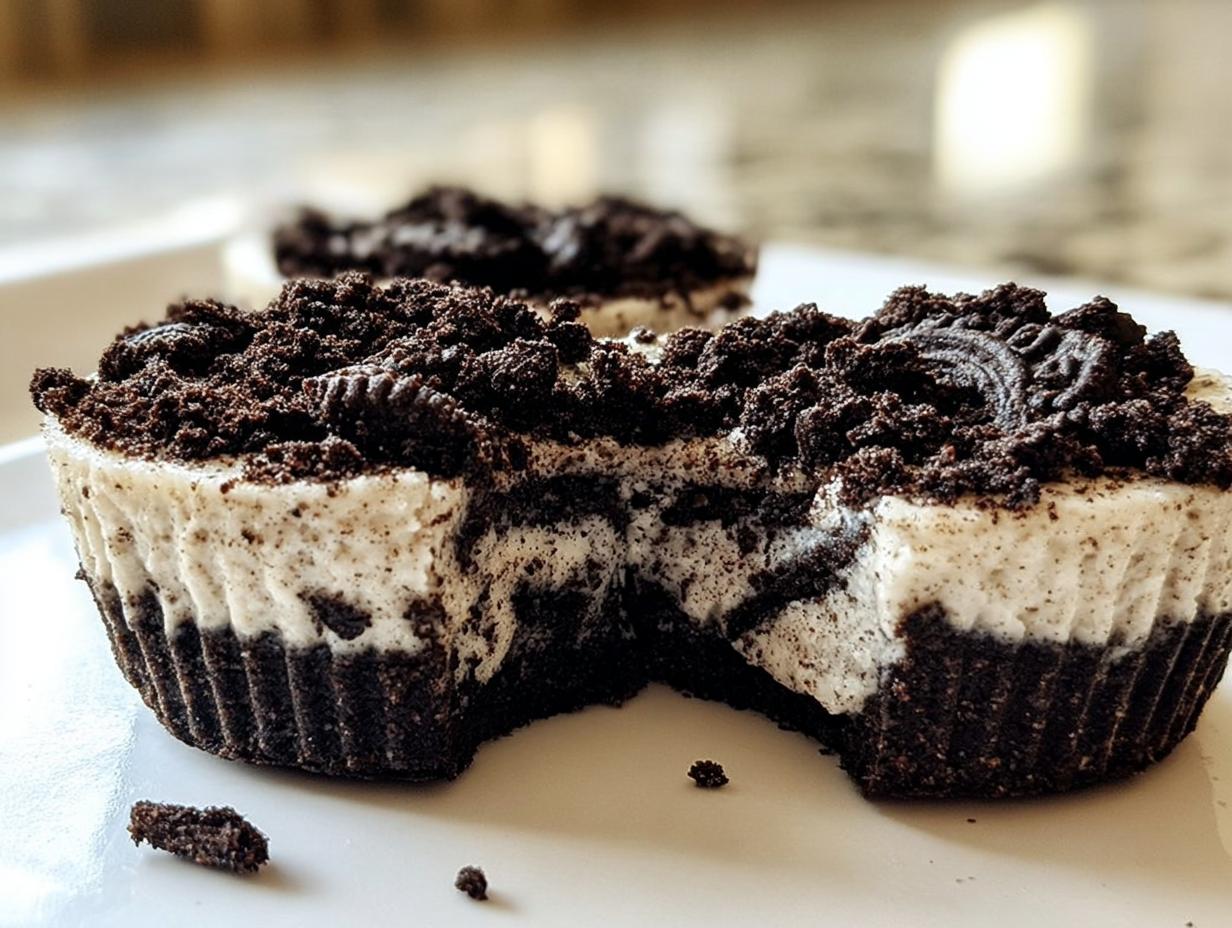
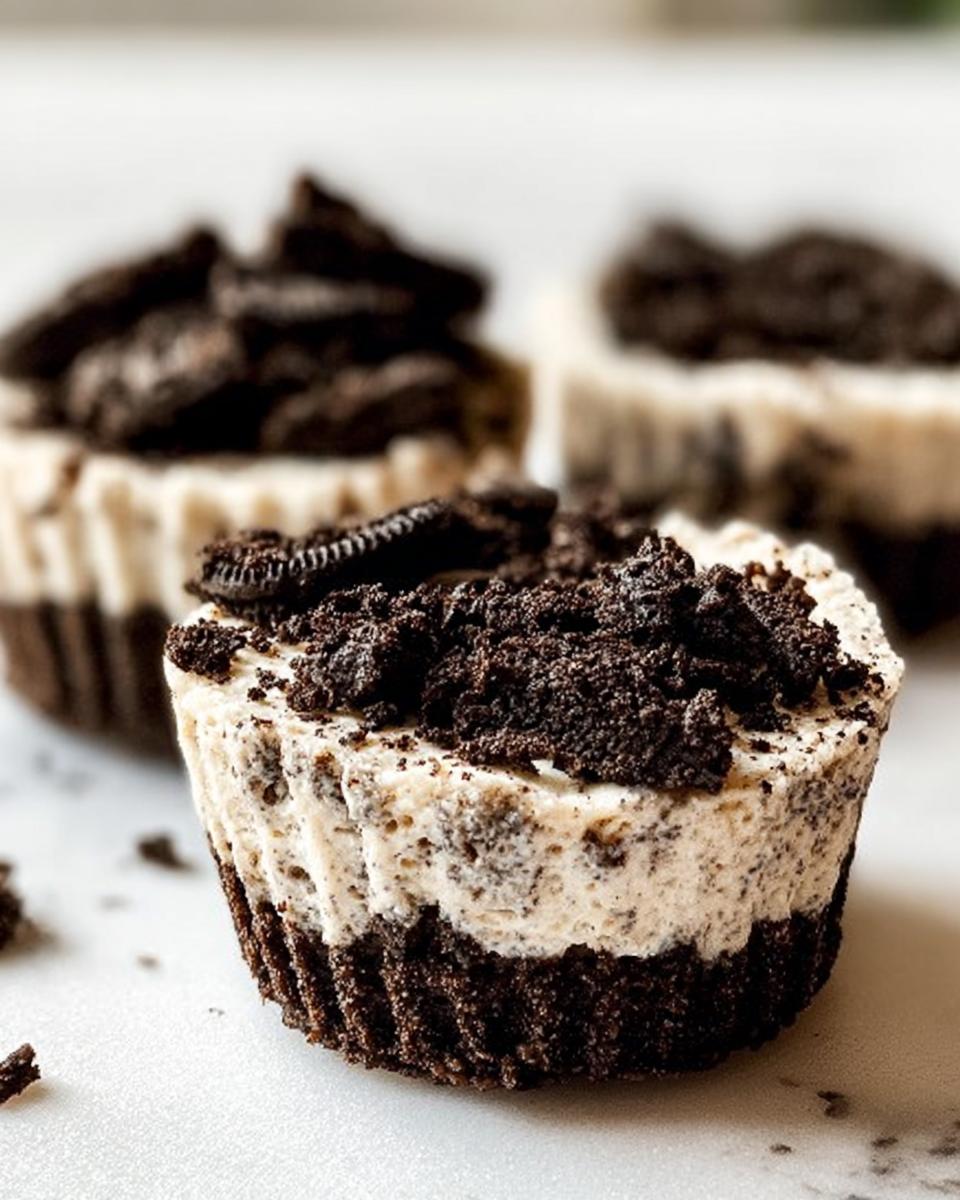
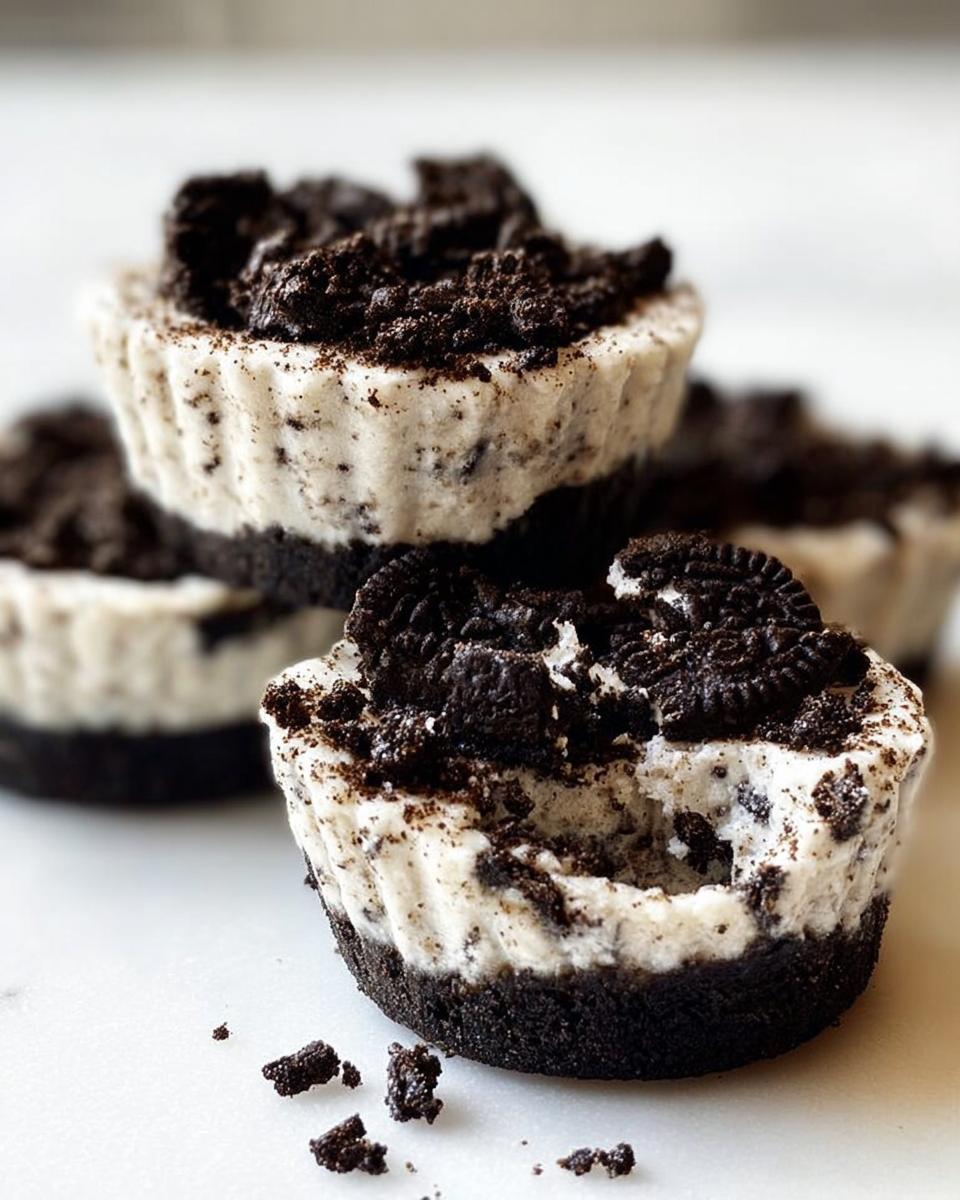
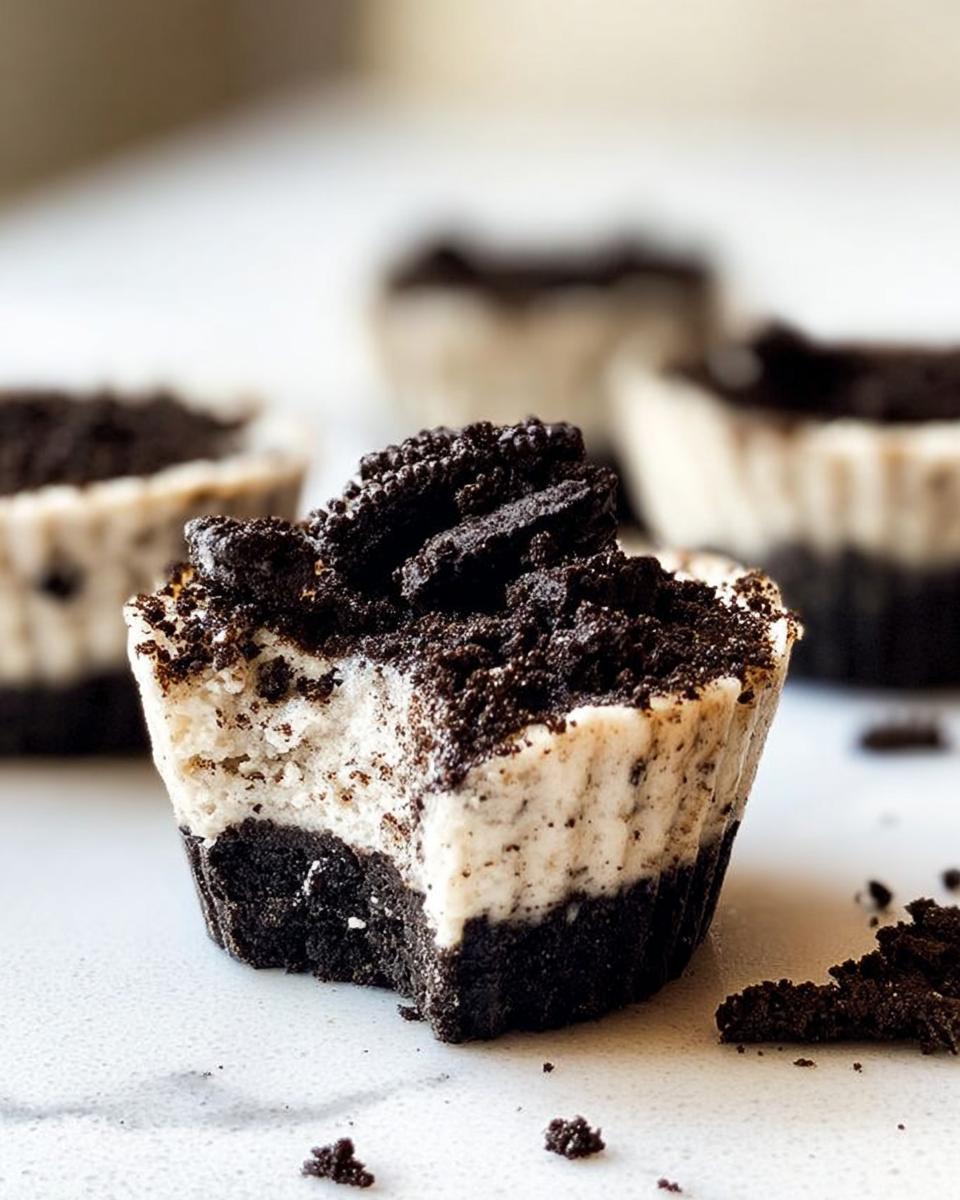
- Flavor Explosion: You get that classic creamy cheesecake filling with chunks of crunchy Oreo, all sitting on a sweet, buttery crust. It’s a flavor party in every single bite!
- Party Perfect: These little bites are ideal for potlucks, parties, or just a special treat for yourself. They look adorable and disappear fast!
Ingredients for Your Healthy No-Bake Oreo Cheesecake Bites
Alright, getting the ingredients together is half the fun! When I’m making these Healthy No-Bake Oreo Cheesecake Bites, I like to have everything prepped and ready to go. It makes the whole process so smooth, and honestly, it feels like you’re cheating a little because it’s so quick!
For the Crust
This is where we build that delicious foundation. We’re using classic Oreos here, but you could totally play around with reduced-fat versions if you’re really trying to keep it light!
- 12 Oreos: Make sure these are finely chopped – think crumbs! A food processor works like a charm for this.
- 1/4 cup butter: Melted for easy mixing. It helps hold all those little Oreo crumbs together.
For the Filling
This is the creamy, dreamy star of the show! It’s rich, but we’re keeping it relatively simple so it doesn’t feel too heavy.
- 7 Oreos: These are just roughly chopped. We want little bits of cookie goodness in our filling, not just dust!
- 8 oz cream cheese: Make sure it’s softened! This is super important so you don’t end up with lumps. Let it sit on the counter for about 30-60 minutes before you start.
- 1/2 cup powdered sugar: This is what gives us that classic sweet cheesecake flavor without being overwhelming.
- 1 teaspoon vanilla extract: A little splash of vanilla goes a long way to making everything taste even better.
- 1 cup heavy whipping cream: This is what makes the filling so light and fluffy! Make sure it’s cold when you whip it up.
For the Topping
A little extra crunch and chocolatey goodness on top is always a good idea, right?
- 5 Oreos: Again, just give these a roughly chopped texture.
Step-by-Step Guide to Making Healthy No-Bake Oreo Cheesecake Bites
Okay, let’s get this dessert party started! Making these Healthy No-Bake Oreo Cheesecake Bites is honestly a breeze, and you’ll be so proud of yourself when you see how gorgeous and delicious they turn out. Trust me, it’s easier than you think! If you’re looking for more easy dessert ideas, check out this low-carb Philly cheesesteak casserole – it’s not a dessert, but it shows how simple great recipes can be!
Preparing the Oreo Crust
First things first, let’s get that crust ready to go. It’s super simple! Take your 12 finely chopped Oreos and toss them into a bowl with the melted butter. Give it a good stir until all those crumbs are nicely coated. Then, spoon an equal amount of this mixture into each of your 12 cupcake liners. Use the bottom of a small cup or spoon to really press them down firmly. You want a nice, even layer so you have a solid base for all that creamy goodness to come! You can find more fun chewiness ideas on sites like Aubrey’s Kitchen.
Creating the Creamy Cheesecake Filling
Now for the exciting part – the filling! In your food processor, combine that softened cream cheese, powdered sugar, vanilla extract, and the heavy whipping cream. Give it a whirl until it’s all super smooth and creamy. Seriously, no lumps allowed! Once it’s perfectly blended, gently fold in those 7 roughly chopped Oreos by hand. You want to see those little cookie pieces throughout the filling, adding that signature Oreo crunch.
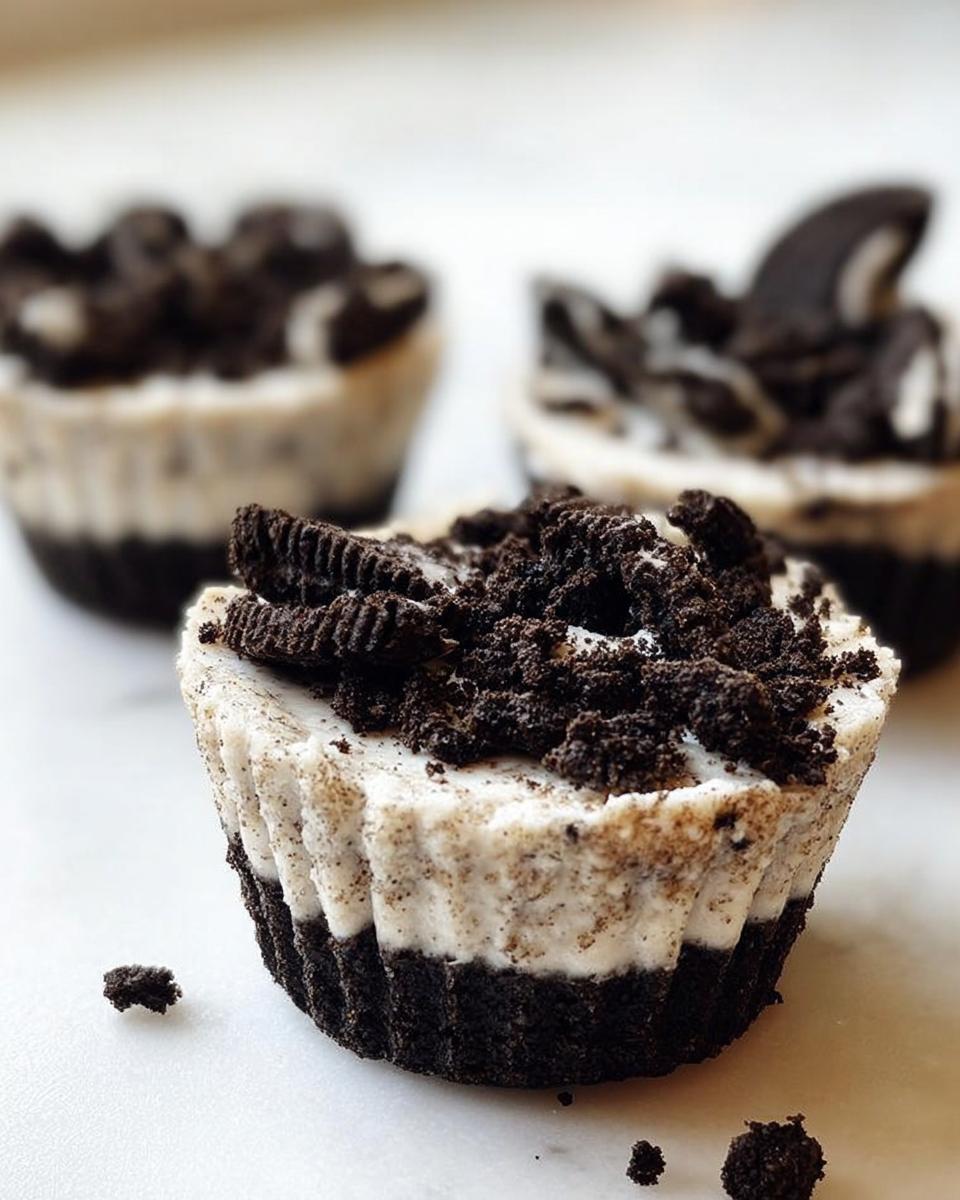
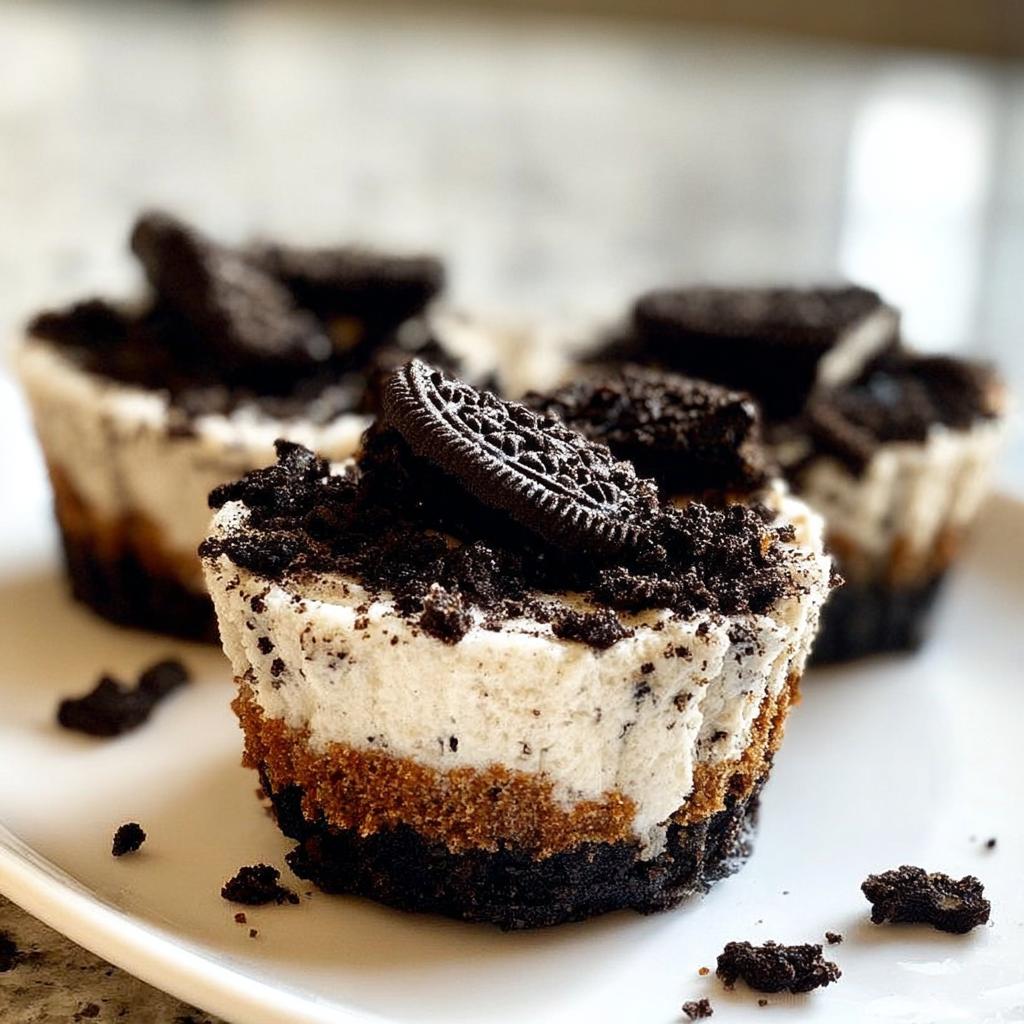
Assembling and Chilling Your Healthy No-Bake Oreo Cheesecake Bites
Time to put it all together! Carefully spoon that luscious Oreo cream cheese mixture on top of each crust in the cupcake liners. Make sure to fill them up nicely! Then, sprinkle those remaining 5 roughly chopped Oreos over the top of each bite. They’re practically begging to be eaten already, I know! Pop the whole tray into the refrigerator for at least 1 hour. This is the crucial step where everything sets up perfectly and those flavors really meld together. You can even pop them in the freezer for a quicker chill-fest!
Tips for Perfectly Healthy No-Bake Oreo Cheesecake Bites
Okay, so you’ve got the recipe, but let me give you a few little secrets to make sure your Healthy No-Bake Oreo Cheesecake Bites are absolutely PERFECT every single time. These aren’t complicated, just little things I’ve learned along the way that make a big difference. You know, the kind of stuff that makes you feel like a pro baker, even when you’re just whipping these up on a Tuesday! If you’re curious about other super simple recipes, you might like this creamy garlic chicken ramen – it’s a lifesaver on busy nights!
First off, that softened cream cheese is non-negotiable! If it’s too cold, you’ll end up with a lumpy filling, and nobody wants that. Let it sit out on the counter for at least 30-60 minutes. You want it soft enough that your finger leaves an easy indent. Also, when you’re whipping the heavy cream, make sure it’s super cold. This helps it whip up light and fluffy, giving you that gorgeous, airy texture in the filling. If it’s warm, it just won’t cooperate!
And for the crust? Don’t skimp on pressing it down firmly! If it’s too crumbly, your bites might fall apart. Use the bottom of a glass or a measuring cup to really pack it in there. It makes all the difference for a sturdy base. Oh, and for a really professional look, try adding a little extra sprinkle of chopped Oreos on top right after you fill them, before they chill. It just makes them look extra fancy, like they came from a bakery!
Ingredient Notes and Substitutions
Sometimes you need to tweak a recipe, right? It’s all part of the fun! For these Healthy No-Bake Oreo Cheesecake Bites, the Oreos are kind of the star, but if you’re looking to mix things up, you’ve got options! If you want to make the crust even more “healthy-ish,” you could try using reduced-fat Oreos, or even blending up some graham crackers with a bit less butter. For the filling, if you’re not a huge fan of powdered sugar or want a slightly different sweetness profile, you could experiment with a sugar-free powdered sweetener, just start with a little less and taste as you go. And hey, if you can’t find regular Oreos, any chocolate sandwich cookie will work its magic!
Frequently Asked Questions about Healthy No-Bake Oreo Cheesecake Bites
Got questions? I’ve got answers! It’s totally normal to wonder about a few things before you dive in, especially when you’re whipping up something a little different like these Healthy No-Bake Oreo Cheesecake Bites. Here are some things folks often ask:
Can I make these vegan?
Oh, that’s a great question! While this recipe uses conventional Oreos and cream cheese, it’s definitely possible to adapt it. You’d want to look for vegan Oreos (many are accidentally vegan!) and use a dairy-free cream cheese alternative, plus a plant-based whipping cream. It might change the texture a tiny bit, but you’d still get that delicious flavor! It’s a fun experiment if you’re feeling adventurous!
How long do they last?
These little gems are pretty forgiving! Stored in an airtight container in the refrigerator, they should stay yummy for about 3 to 4 days. The crust might soften a little over time, but they’ll still be delicious. If you want them to last even longer, you can totally freeze them! Just pop them in a freezer-safe bag or container, and they’ll be good for up to a month. Just let them thaw a bit before you dig in!
Are these truly healthy?
Okay, so “healthy” can mean a lot of different things, right? These Healthy No-Bake Oreo Cheesecake Bites are definitely a lighter take on a classic dessert. We’re cutting out the baking and using less sugar than many traditional recipes. PLUS, they’re portion-controlled thanks to being little bites! They’re a great option when you want a treat without going totally overboard. Think of them as a more mindful indulgence that still hits that sweet spot! For more ideas on mindful eating, check out this recipe for garlic parmesan chicken thighs and potatoes.
Can I use different kinds of Oreos?
You bet! That’s the fun of a recipe like this – it’s super adaptable. You can totally swap in Golden Oreos, Double Stuf (though you might want to adjust sweetness slightly), or even seasonal flavors if you can find them. Just remember that the color and flavor might change a bit, but it’ll still be a delicious Oreo cheesecake bite!
What if I don’t have a food processor?
No worries at all! If you don’t have a food processor, you can totally crush those Oreos for the crust by hand. Just put them in a sturdy zip-top bag, lay it flat on your counter, and go at it with a rolling pin or even the bottom of a heavy pan. For the filling Oreos, a good old-fashioned knife will do the trick for roughly chopping them. It’s a bit more elbow grease, but totally doable!
Storing and Reheating Your Cheesecake Bites
So, you’ve made these amazing Healthy No-Bake Oreo Cheesecake Bites and maybe, just maybe, there are a few leftovers (a rare occasion in my house!). Don’t fret! Keeping them fresh is a piece of cake… or, well, cheesecake! For the best texture, store them in an airtight container in the refrigerator. They’ll stay wonderfully delicious for about 3 to 4 days that way. If you’ve made a huge batch or just want to have some on hand for a future craving, pop them into a freezer-safe container or bag. They freeze beautifully for up to a month! Just let them thaw for a bit in the fridge or on the counter if they were frozen. If you’re looking for other make-ahead marvels, this low-carb bacon cheeseburger casserole is fantastic to prep ahead too!
Estimated Nutritional Information
Alright, let’s talk numbers for these yummy Healthy No-Bake Oreo Cheesecake Bites! Keep in mind that these are just estimates, of course. Depending on the exact brands of Oreos and cream cheese you use, and maybe how thick you make that crust, your exact nutritional values might shift just a little. But generally, each bite comes in around 240 calories. They’ve got a good balance of fat, some protein, and carbohydrates to satisfy that sweet craving! For more delicious recipes, check out this egg roll in a bowl – it’s a speedy weeknight winner!
Share Your Creations!
I absolutely LOVE seeing what you all create in your own kitchens! If you whip up these Healthy No-Bake Oreo Cheesecake Bites, please, please, PLEASE let me know how they turned out. Drop a comment below, give the recipe a star rating if you enjoyed it, or better yet, share a pic on social media and tag me! Seeing your delicious results makes my day. For more tasty recipe ideas, you’ve gotta check out these creamy Cajun chicken rice bowls!
Healthy No-Bake Oreo Cheesecake Bites
Ingredients
Equipment
Method
- Roughly chop 5 Oreos for the topping and set aside. Roughly chop 7 Oreos for the filling and set aside. Finely chop 12 Oreos for the crust and set aside.
- Melt the butter. In a bowl, mix the melted butter with the 12 finely chopped Oreos.
- Line a cupcake tray with 12 cupcake liners. Fill each liner with an equal amount of the Oreo and butter mixture. Press down to flatten. You can use the bottom of a measuring cup or a spoon to flatten.
- In a food processor, combine the cream cheese, powdered sugar, vanilla extract, and heavy cream. Mix until thoroughly combined.
- Gently mix in the 7 roughly chopped Oreos by hand.
- Fill the 12 cupcake liners, on top of the Oreo crust, with equal amounts of the creamy Oreo mixture.
- Top each cheesecake bite with the remaining 5 roughly chopped Oreos.
- Refrigerate for 1 hour. These can also be frozen.
Nutrition
Notes
Tried this recipe?
Let us know how it was!
Certified Nutritional Science Authority
The intersection of celiac disease and metabolic health fascinated me from my first dietetic internship. Watching patients struggle to find foods supporting both their autoimmune condition and weight goals launched my career mission: proving medically necessary diets can be nutritionally optimal.
For twelve years, I’ve specialized in gluten-free living while achieving metabolic health objectives. My published research demonstrates that properly planned gluten-free, low-carb eating provides superior nutrition compared to standard approaches.
The hidden trap? Most commercial gluten-free products are carb bombs – rice flour and potato starch masquerading as healthy alternatives. My frameworks avoid this completely, using nutrient-dense ingredients like almond flour and flaxseed that enhance rather than just replace.
Every recipe I review meets rigorous standards: adequate protein for metabolic support, healthy fats for satiety, proper fiber levels for digestive health – all maintaining strict gluten-free protocols for celiac management. I’ve guided over 500 individuals through this optimization process.
My personal gluten-free, low-carb lifestyle fuels my long-distance cycling and triathlon training – proof that these approaches deliver sustained energy and mental clarity. Medical necessity doesn’t mean nutritional compromise.