

Are you tired of spending hours in the kitchen trying to make healthy meals that actually taste good? I totally get it! When I was first diagnosed with celiac disease, I felt completely overwhelmed by the idea of changing my whole diet. It felt like all the delicious things were off-limits forever. But you know what? One evening, while messing around in my kitchen, I whipped up this vibrant quinoa salad – packed with colorful veggies and a zesty dressing – and it was a game-changer! It looked and tasted like something you’d get at a fancy cafe, and that’s when I realized healthy eating could actually be *fun*. It sparked this whole passion for creating incredible recipes. And that’s why I’m so excited to share this one with you today: it might just be **The Only Healthy Meals Recipes Recipe You’ll Need (2025)**!
Why This is The Only Healthy Meals Recipes Recipe You’ll Need (2025)
Seriously, this recipe is a total lifesaver! It’s like the culinary superhero we all need for 2025. It takes all the guesswork out of eating well. You get amazing flavor and texture without a ton of fuss, which is perfect for anyone juggling work, family, or just life! Plus, it’s super adaptable, which means it’s ready for whatever healthy eating trends pop up next. This is your go-to for simple, delicious, and truly healthy meals that won’t have you chained to the stove.
Effortless Preparation for Busy Lifestyles
The best part? It’s totally “no-knead”! You just mix up a few things, let it do its thing overnight, and then pop it in the oven. That’s it! No fancy techniques, no endless chopping. This means you can get a beautiful, crusty loaf of bread without spending your precious free time elbow-deep in flour. It’s perfect for those weeknights when you just want something good and wholesome without all the extra effort. Honestly, it feels like magic!
Nutrient-Rich Ingredients
We’re talking simple, wholesome ingredients here. We use good quality flour, active yeast, and you can even throw in some fresh rosemary for an extra kick. And don’t forget the beer or warm water – they help create this incredible depth of flavor. It’s all about using what you have to create something nourishing and satisfying. It’s the kind of food that makes you feel good from the inside out, which is exactly what healthy eating should be all about!
Gather Your Ingredients for The Only Healthy Meals Recipes Recipe You’ll Need (2025)
Alright, let’s get our mise en place ready! Having everything prepped makes the whole process so much smoother, especially for this recipe that’s going to be your new healthy go-to. You don’t need anything super fancy, just a few staples that come together to make this amazing loaf. Trust me, taking a minute to get these all measured out makes the magic happen without a hitch.
For the Bread
Here’s what you’ll need to make your no-knead bread:
- 3 cups all-purpose flour
- 2 teaspoons instant yeast (the rapid rise kind works best!)
- 1-2 tablespoons chopped fresh rosemary (if you’re feeling fancy, totally optional but smells amazing!)
- 2 teaspoons kosher salt
- 1 (12 ounce) can or bottle beer, at room temperature (or you can use 1 1/2 cups warm water if you prefer!)
Step-by-Step Guide to The Only Healthy Meals Recipes Recipe You’ll Need (2025)
Okay, let’s get down to business and actually make this amazing bread! It’s seriously so straightforward, you’ll wonder why you haven’t been making bread this way forever. Remember, the less fuss, the better, right? Just follow along, and you’ll have a beautiful, crusty loaf that’ll make your kitchen smell incredible. You’ve got this!
Mixing the Dough
First things first, grab a nice big bowl. Toss in your flour, yeast, salt, and that optional rosemary if you’re using it. Give it a quick whisk to get everything mixed up. Then, pour in your room-temperature beer or warm water. Now, grab your spatula and just mix until it all comes together. It’ll be shaggy and sticky – don’t worry, that’s exactly what you want! Cover the bowl with plastic wrap or a towel and just let it sit. The longer, the better, really. Overnight is *chef’s kiss* perfect for developing all those yummy flavors. Aim for at least 12 hours, okay?
Preheating and Dough Rise
Alright, so your dough has had its long nap! Now, it’s time to get the oven going. Crank it up to 450°F (that’s about 235°C). What’s super important here is to put your big Dutch oven right into the oven while it preheats. Let it get seriously hot for at least 30 minutes. While that’s happening, dust your counter or a piece of parchment paper really well with flour. Gently scrape your sticky dough onto the flour. It’ll be pretty loose – don’t freak out! Form it into a rough ball and pop it onto your floured parchment paper. Cover it loosely and let it sit for about an hour. You’ll see it puff up and double in size – that’s your sign it’s ready for its hot bath!
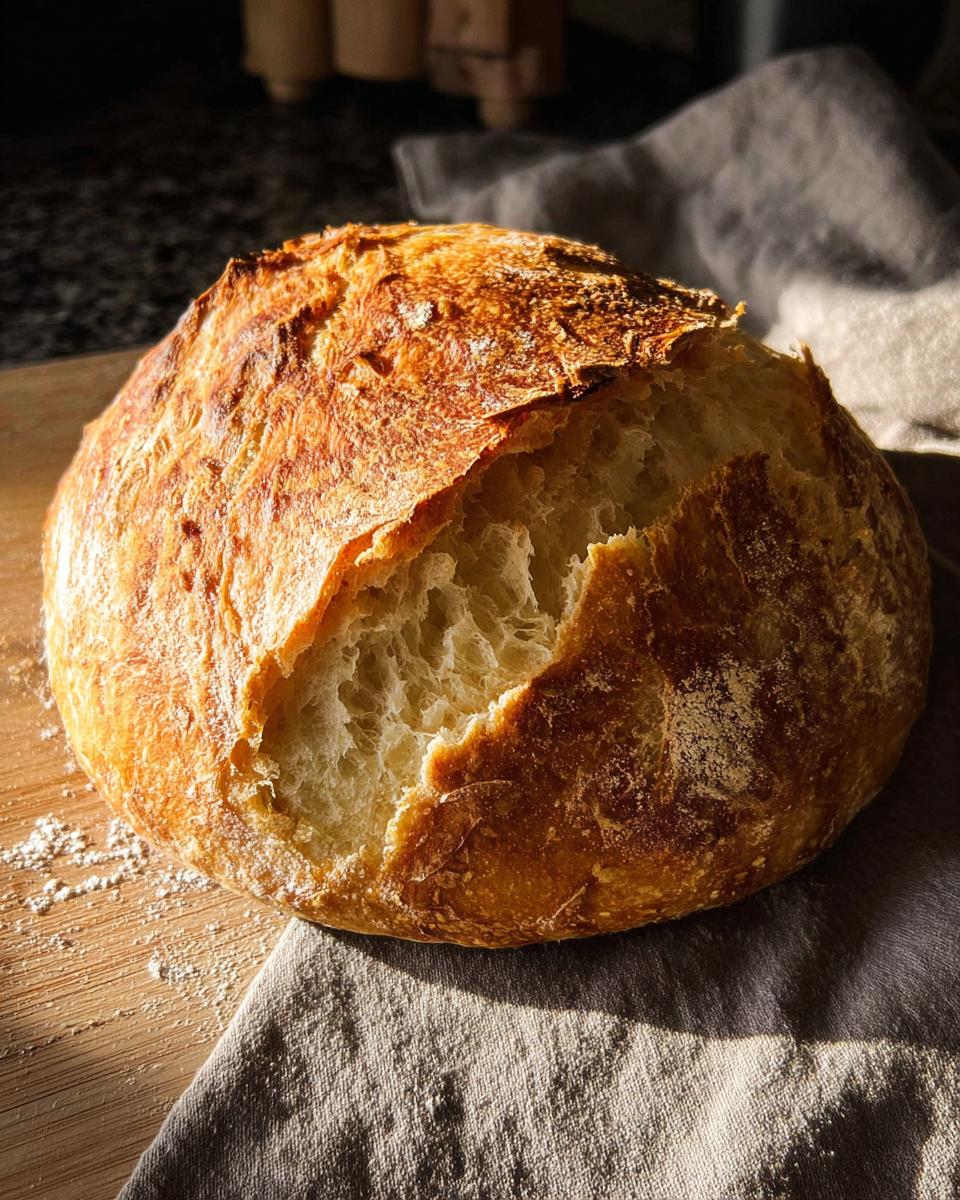
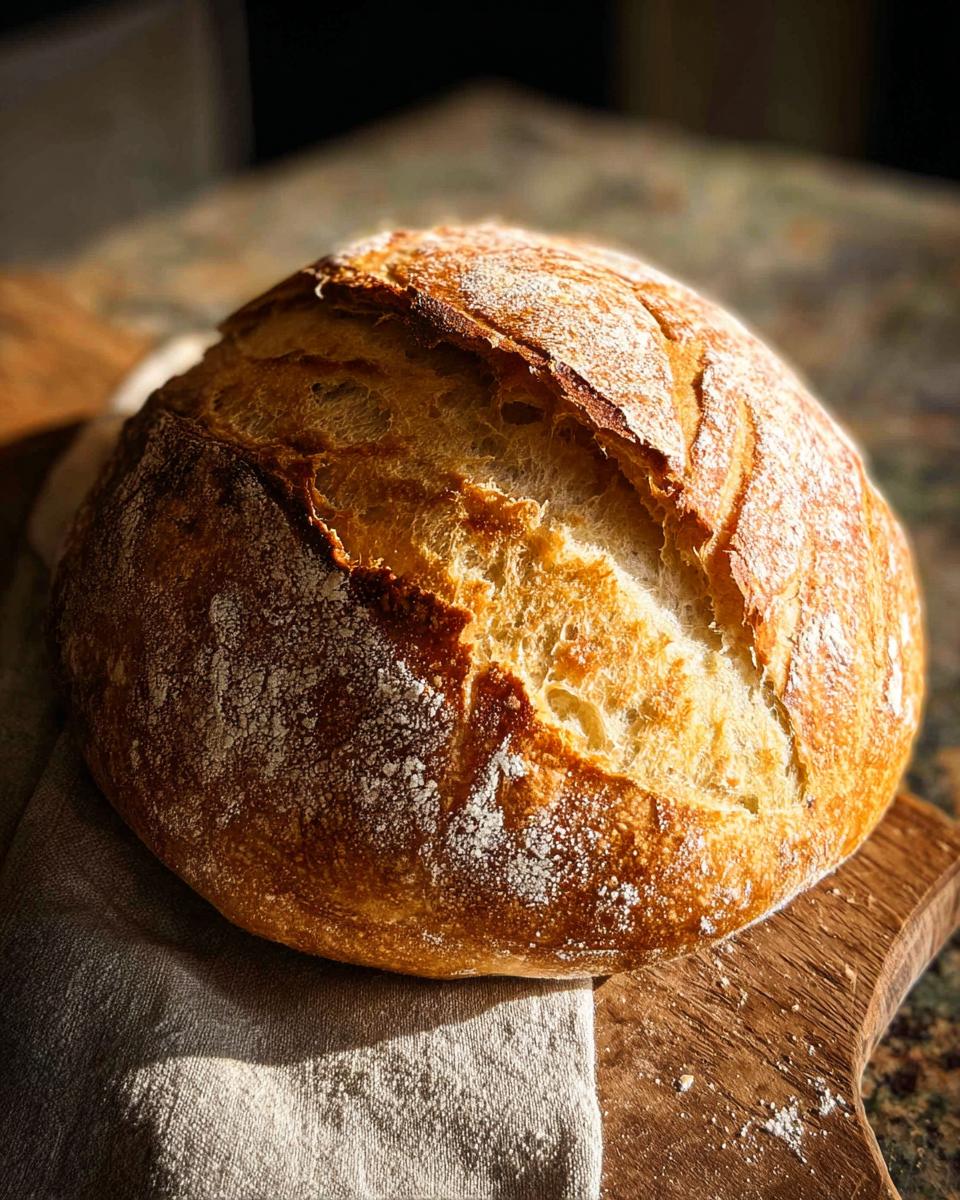
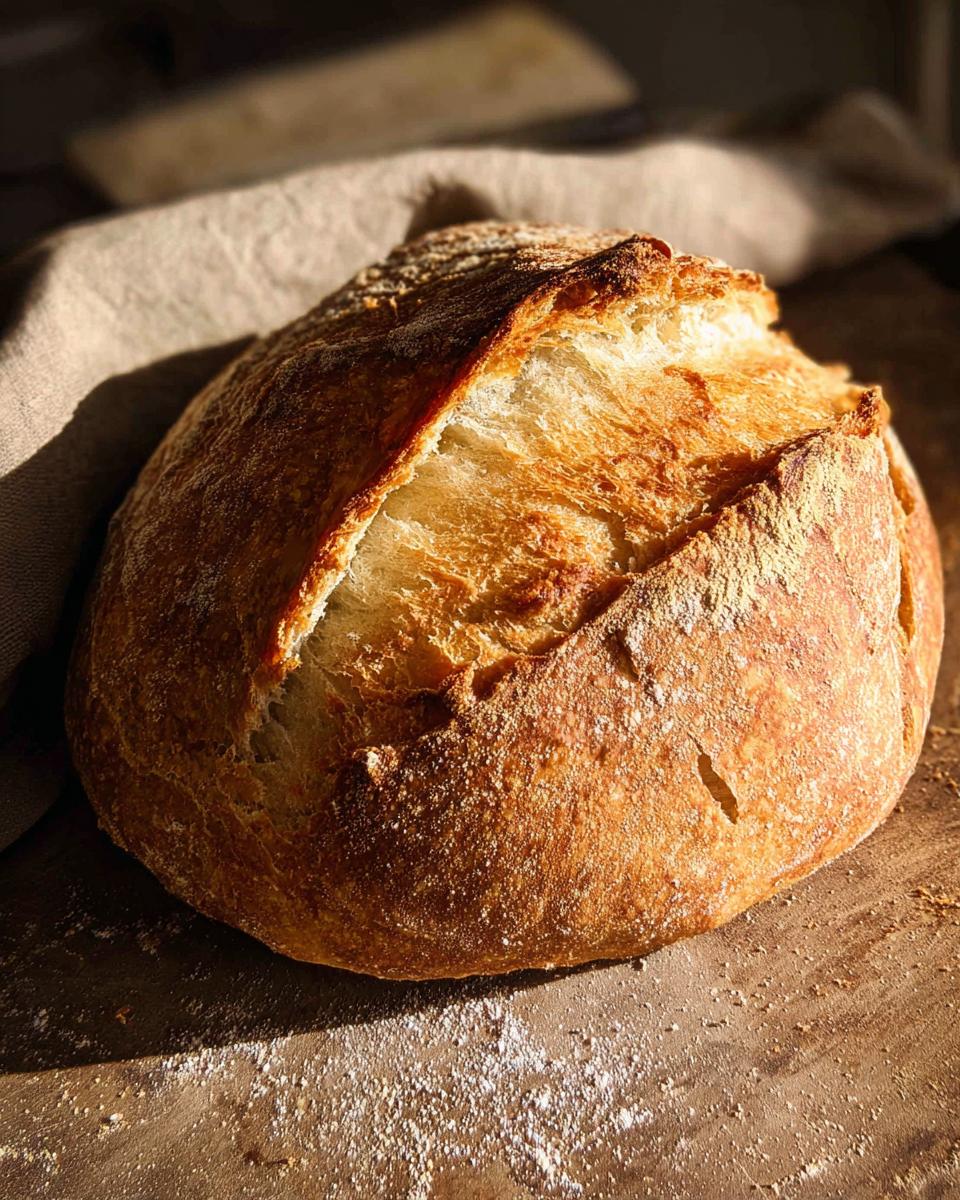
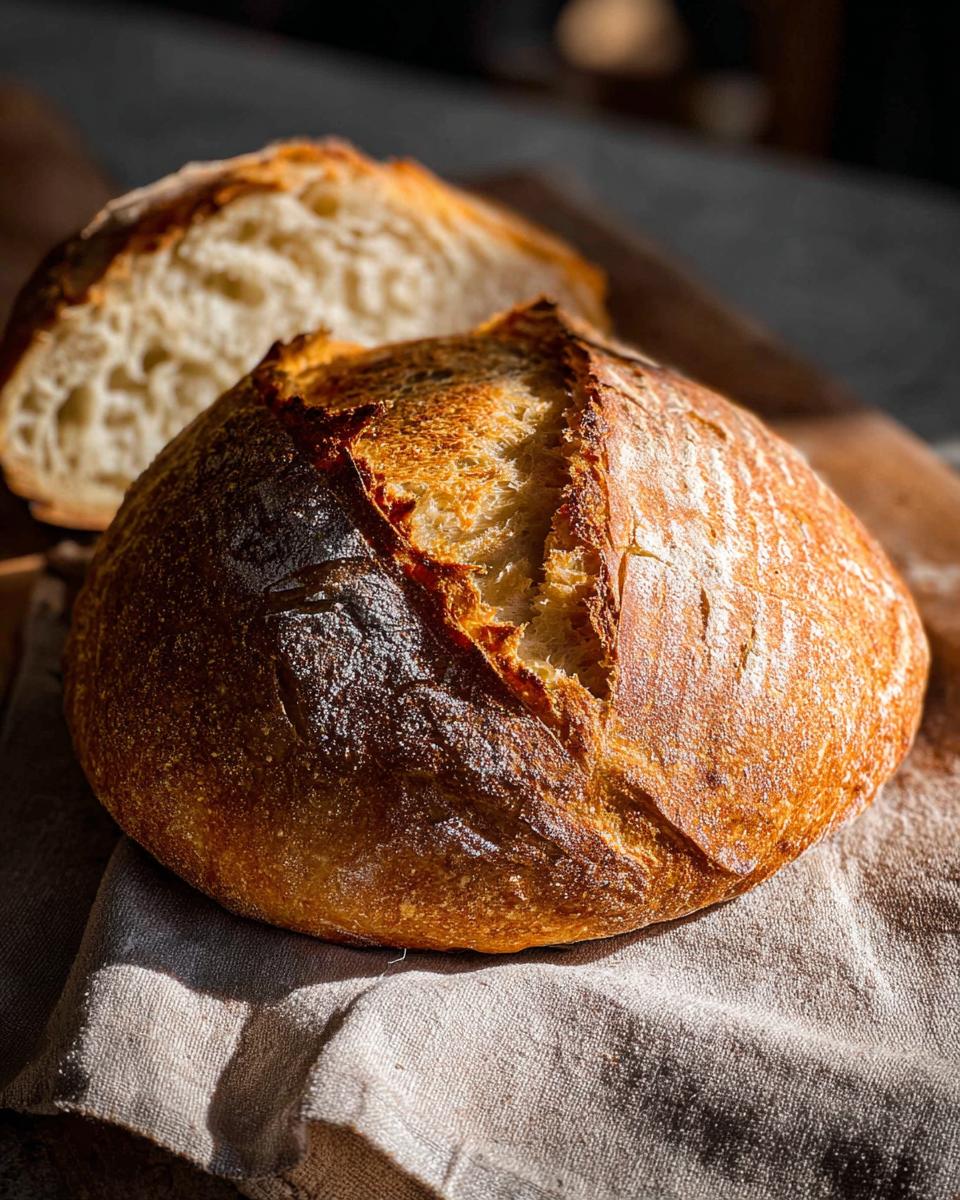
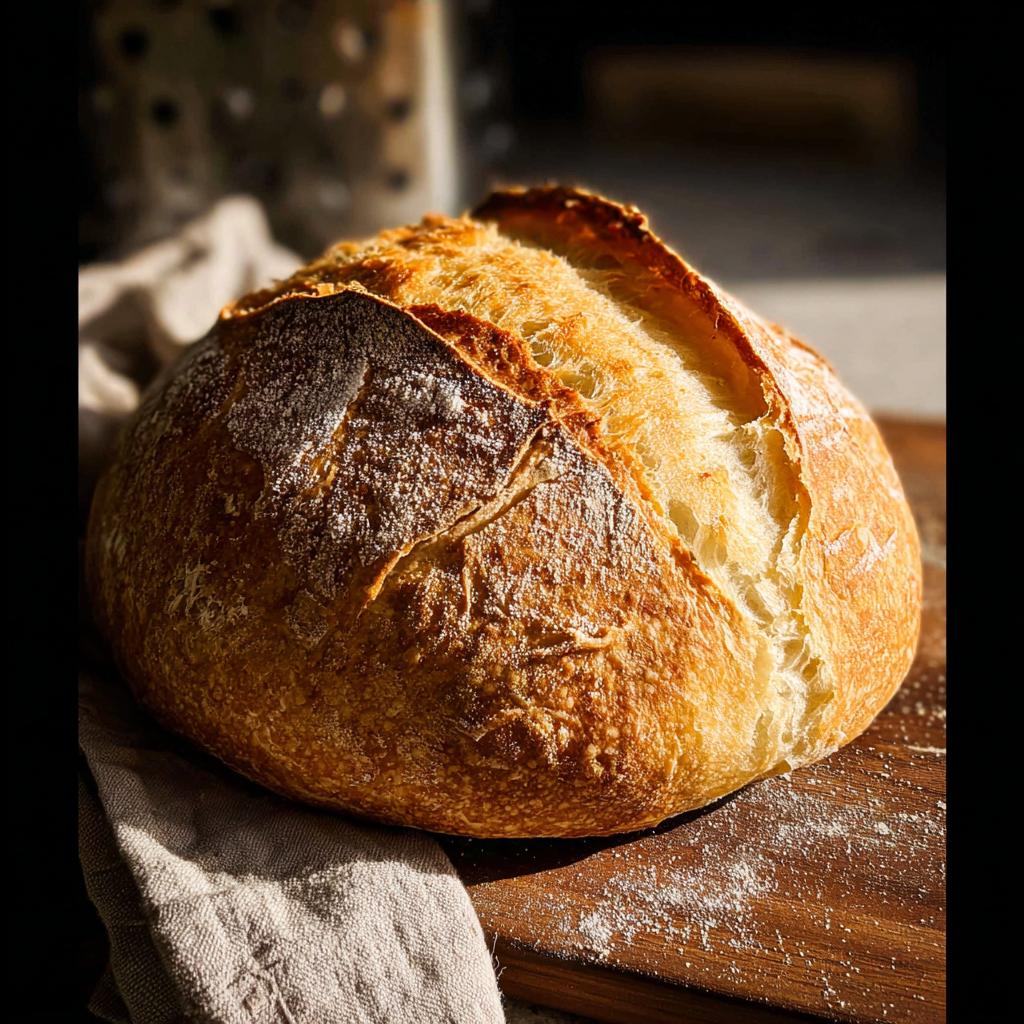
Baking Your Loaf
Okay, moment of truth! Carefully take your super-hot Dutch oven out of the oven. Using the parchment paper as a sling, gently lower your dough ball into the hot pot. Pop the lid back on – this traps the steam and gives you that amazing crust. Bake it like this for 30 minutes. Then, take the lid off. Wow, it’ll already look amazing! Continue baking for another 15 to 20 minutes, or until it’s a deep, gorgeous golden brown. Once it’s ready, carefully lift it out using the parchment paper and let it cool on a wire rack. The smell alone is worth it! You can check out more tips here.
Tips for Success with Your Healthy Meals Recipes
Okay, so you’ve got the recipe, but let’s talk about making sure your bread turns out absolutely perfect every single time. It’s all about a few little tricks! Think of these as the secrets that’ll take you from “pretty good bread” to “OMG, where did you buy this?!” territory. We want that beautiful crust and that wonderfully soft inside, and these tips will get you there, trust me! You can also check out some other great healthy chicken recipes for more ideas.
Achieving the Perfect Crust
Want that crackly, golden crust that just screams delicious? Make sure your Dutch oven is screaming hot before your dough goes in – that initial blast of intense heat is key! And don’t you dare peek too early at the 30-minute mark with the lid on. That trapped steam is like a personal sauna for your dough, making the crust *super* crispy when you finally take the lid off.
Ingredient Temperature Matters
This might seem minor, but it’s a big deal for your yeast! Make sure your beer or water is room temperature. If it’s too cold, your yeast will be sluggish and won’t do its job properly. Too hot, and you’ll kill it! Room temperature is happy temperature for yeast, letting it wake up and do its thing to make your dough nice and airy. It really makes a difference in the final rise and texture.
Serving and Storing Your Delicious Bread
Okay, so you’ve got this gorgeous, homemade loaf of bread. Now what? The absolute best way to enjoy it is still warm, sliced thick, and slathered with a generous amount of softened butter and a sprinkle of flaky sea salt. It’s simple, but oh-so-good! If you happen to have any leftovers (which is rare in my house!), just wrap it up tightly in plastic wrap or pop it in an airtight bag at room temperature. It’s best enjoyed within a day or two!
Frequently Asked Questions About Healthy Meals Recipes
Got questions about making this awesome no-knead bread? Or maybe you’re just curious about healthy meals in general? I’ve got you covered! Here are some things people often ask, and I’ll give you my best advice to make this recipe a total win. If you have more questions, feel free to get in touch!
Can I use different liquids besides beer?
Absolutely! If beer isn’t your jam, no worries at all. You can totally use warm water instead. It’ll still work beautifully! The beer just adds a little extra depth of flavor, but water makes a fantastic, classic loaf too. You could even try milk for a slightly richer crumb, though I haven’t tested that one myself much but it should work!
How long does the dough last if I don’t bake it right away?
So, I usually like to bake it within 12-24 hours at room temperature. But if you need to wait a bit longer, you can definitely pop the covered bowl in the fridge! It’ll slow down the yeast’s activity. Just bring it back to room temp for about 30 minutes to an hour before you plan to shape and bake it. It might need a little extra rise time after chilling.
What if my dough is too sticky?
Okay, first rule: don’t panic! This dough is supposed to be sticky. It’s what makes it so easy and gives you that great texture. Instead of dumping in more flour (which can make it tough), just use a wet spatula or lightly oiled hands to help shape it. When you’re ready to bake, make sure that parchment paper (or your work surface) is *really* well-floured. That flour is your best friend here for handling fussy dough!
Estimated Nutritional Information
Okay, so while this bread is absolutely delicious and super easy, remember that the exact nutritional info can change depending on what kind of flour you use, how much beer versus water you add, and, of course, what you serve it with! But as a rough guide, a slice of this no-knead bread typically has about 150-180 calories, around 2-4g of fat, 5-7g of protein, and 25-30g of carbohydrates. These are just estimates, of course, to give you a general idea. You can find great resources for diabetic meal plans if you need more specific nutritional guidance for your diet!
Share Your Healthy Meals Recipes Creations
Alright, now it’s YOUR turn! Have you made this amazing no-knead bread? I would absolutely LOVE to hear all about it! Drop a comment below, tell me how it turned out, or even give the recipe a star rating! If you snapped some photos, definitely tag me on social media – I can’t wait to see your beautiful loaves. And for more about my journey and other kitchen adventures, you can always check out my About page!
No-Knead Bread
Ingredients
Equipment
Method
- In a bowl, stir together the flour, yeast, rosemary (if using), and salt. Add the beer and mix with a spatula until combined. Cover the bowl and let sit at room temperature for at least 12 hours, but ideally overnight.
- Preheat oven to 450° F. Place a large Dutch oven in the oven to preheat for 30 minutes.
- Generously dust a work surface with flour. Scrape the dough out of the bowl. It should be loose and sticky. Form the dough into a ball and place on a piece of parchment. Cover and allow to rise for 1 hour, until doubled in size.
- When ready, carefully lift the dough and the parchment and place in the Dutch oven. Bake, covered, for 30 minutes. Remove the lid and continue baking until the bread is a deep, golden brown, about 15-20 minutes more. Remove from the oven. Enjoy with softened butter and sea salt.
Notes
Tried this recipe?
Let us know how it was!
Certified Gluten-Free Culinary Master
Everything changed in 2017 when I received my celiac diagnosis. After ten years as a traditional pastry chef creating elaborate wedding cakes and French pastries, I suddenly couldn’t even taste my own work. It felt like the end of my culinary world.
Instead, it became my greatest challenge. I had to completely relearn baking – understanding how gluten-free flours behave differently, how they bind, how they absorb moisture. Adding the low-carb requirement? That was like solving a puzzle with half the pieces missing.
My breakthrough came with what I now call my “foundation flour blend system” – different combinations that seamlessly replace wheat flour while maintaining low-carb macros. These techniques have been adopted by culinary schools and have helped countless bakers who thought their favorite treats were gone forever.
That first successful batch of gluten-free, low-carb chocolate chip cookies? Watching my husband close his eyes and smile told me I’d found my true calling. Now, with over 300 tested recipes, I prove daily that dietary restrictions don’t mean culinary limitations.
When I’m not experimenting in my Austin test kitchen, I’m teaching weekend workshops or tending my herb garden with Biscuit, my rescue beagle who’s become an expert at detecting oven timers.