

Ever stare longingly at those gorgeous cakes in fancy bakery windows and think, “There’s no way I can make that at home”? Well, I’m here to tell you, you absolutely can! I’m Maria, and I used to feel the same way until I started tweaking and testing. This recipe, Restaurant-Style Cake Ideas Recipes at Home (2025), is my secret weapon for pulling off those stunning, restaurant-worthy desserts right in my own kitchen, all without needing a pastry degree. Trust me, it’s surprisingly doable and oh-so-delicious!
Why You’ll Love These Restaurant-Style Cake Ideas Recipes at Home (2025)
Seriously, get ready to impress yourself and everyone you know! These Restaurant-Style Cake Ideas Recipes at Home (2025) are a game-changer because:
- They’re surprisingly easy! You don’t need fancy gadgets, just a little love and patience.
- The results are WOW! We’re talking gorgeous, moist cakes that look like they came straight from a patisserie.
- Taste that rocks! That gooey, nutty topping is pure heaven, and the cake itself is perfectly tender.
- Perfect for special days, but also totally amazing for just making a Tuesday feel special.
Essential Ingredients for Your Restaurant-Style Cake
Alright, let’s get down to business! To make this amazing cake, you’ll need a few things. Don’t worry, most of them are probably already in your pantry. We’ll split them up into what goes into the cake itself and what makes that dreamy topping!
For the Cake
You’ll need:
- 2 cups all-purpose flour (that’s about 8 1/2 ounces)
- 2 cups granulated sugar
- 1 1/4 teaspoons baking soda
- 3/4 teaspoon table salt
- 2 large eggs
- 2 teaspoons vanilla extract
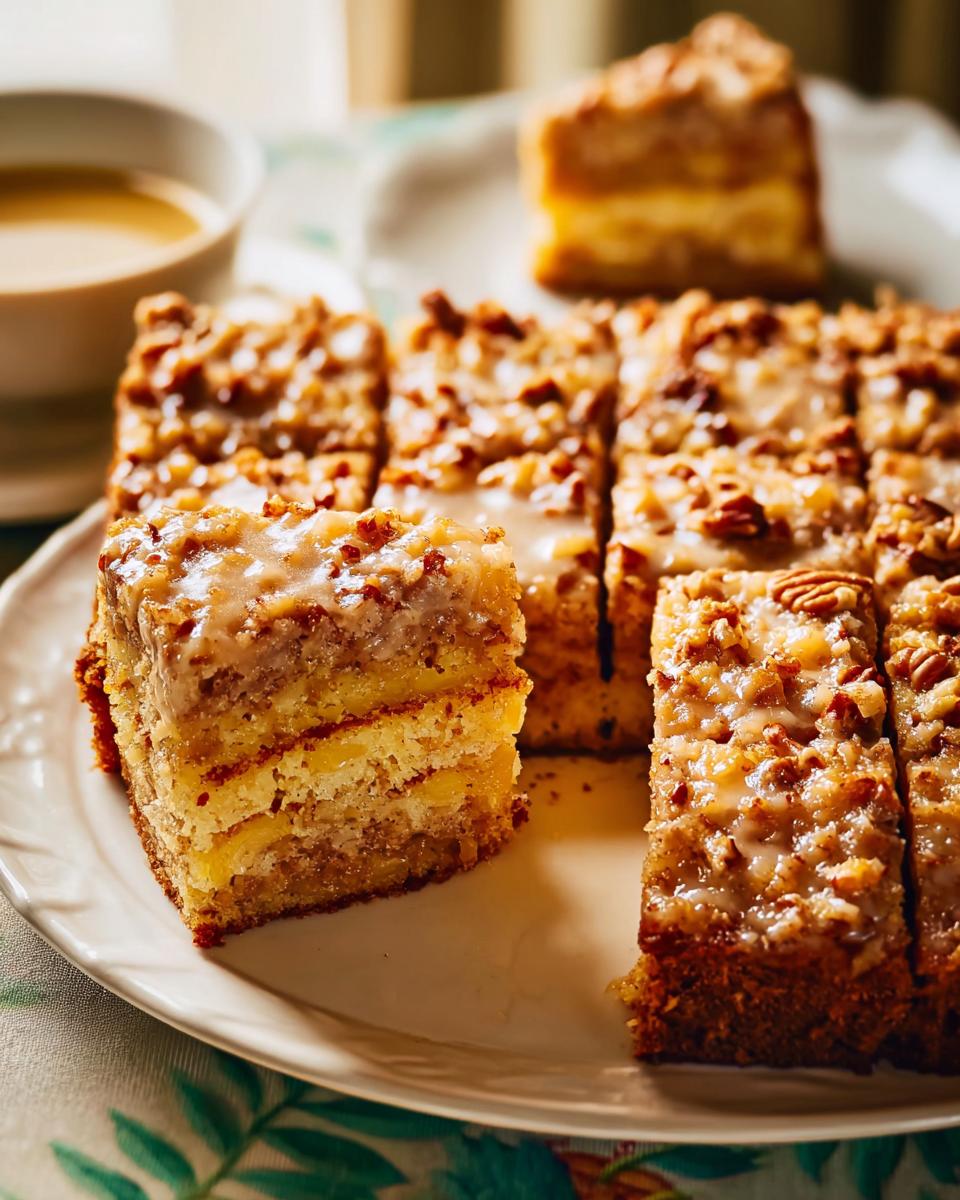
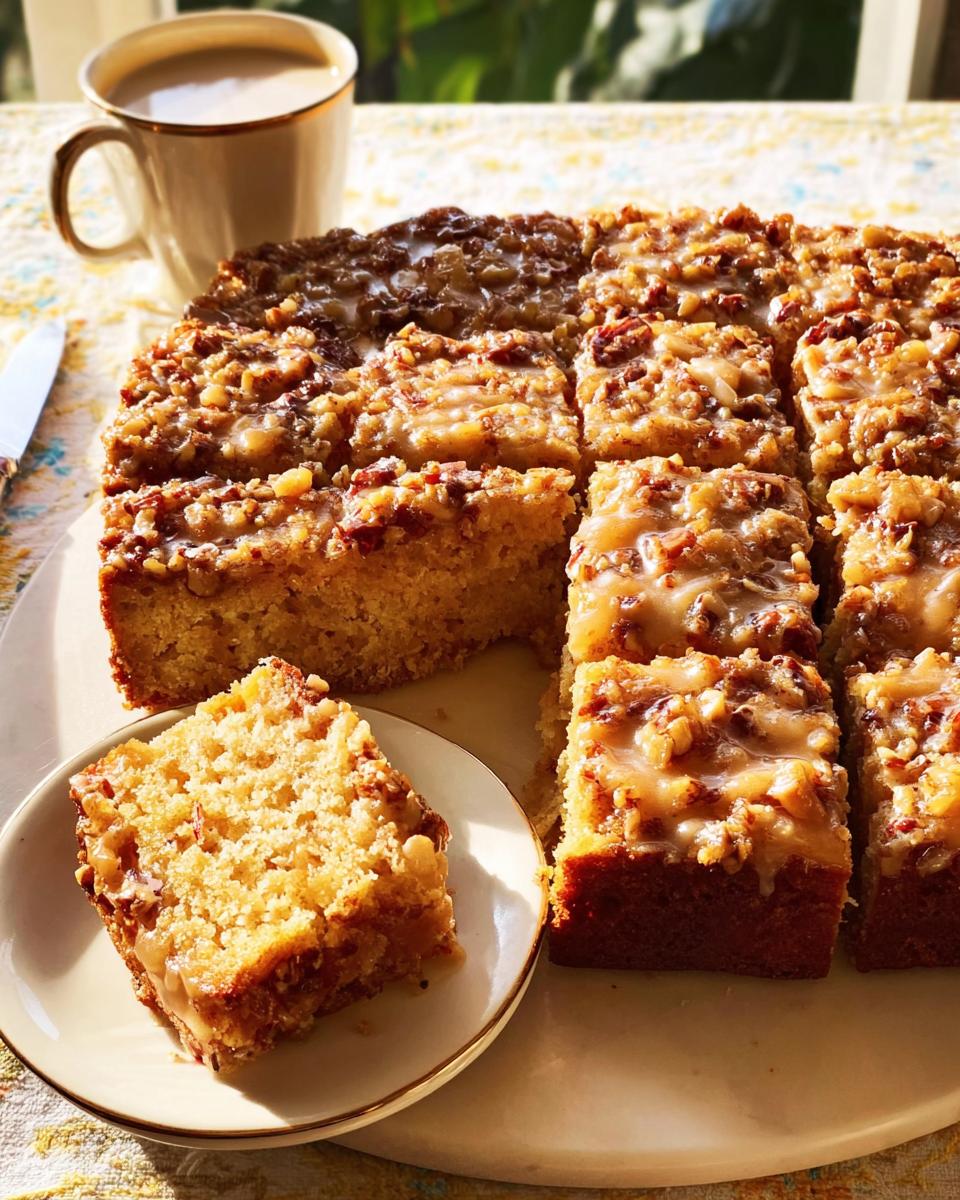
- 1 (20-ounce can) crushed pineapple, juice and all – don’t drain it!
For the Topping
And for that incredible topping:
- 1/2 cup unsalted butter
- 1/4 teaspoon table salt
- 1 cup granulated sugar
- 2/3 cup evaporated milk
- 1 cup chopped toasted pecans (toasting them first makes a HUGE difference!)
- 1 cup flaked sweetened coconut
- 1 teaspoon vanilla extract
Just grab these and you’re ready to make some magic!
Step-by-Step Guide to Restaurant-Style Cake Ideas Recipes at Home (2025)
Okay, so you’ve got your ingredients, your pan is ready, and you’re itching to get baking! This is where the real fun begins. Follow these steps for your Restaurant-Style Cake Ideas Recipes at Home (2025), and you’ll be amazed at how simple it is to create something truly special. It’s a lot like the famous “do-nothing cake” too, in the best possible way!
Preparing the Cake Batter
First things first, crank that oven up to 350°F (that’s 175°C for some of you!). Get your 13×9-inch pan ready by lining it with parchment paper – this is your best friend for easy cleanup later. Now, grab a big bowl and whisk together the flour, sugar, baking soda, and salt until they’re all buddies. Make a little well in the middle, crack in those two eggs, and give them a gentle whisk right there. Then, stir in the vanilla and that glorious crushed pineapple (juice and all!). Just mix until it’s all blended into a lovely, smooth batter. Easy peasy!
Baking the Cake
Pour that beautiful batter into your prepared pan, spreading it out evenly. Pop it into your preheated oven. It’ll need about 33 to 36 minutes. You’ll know it’s ready when a wooden pick poked into the center comes out clean – no wet batter clinging to it! The second it’s out, grab that wooden spoon handle and poke holes all over the cake. Don’t wait around for this part!
Crafting the Delicious Topping
While the cake is still warm, let’s get that topping going. Grab a medium saucepan and melt the butter over medium-high heat. Add your salt and then just watch it! Keep stirring occasionally until the butter smells like roasted nuts and turns a lovely caramel color – this usually takes about 3 to 4 minutes. Be careful, it can go from golden to burnt in a flash! Now, stir in the sugar and evaporated milk. Bring it to a rolling boil, then turn the heat down just enough to keep it bubbling away nicely. Let it cook and thicken a bit for another 3 to 5 minutes. Take it off the heat and stir in those toasted pecans, flaked coconut, and the vanilla. Wow, that smells amazing already!

Assembling and Serving Your Masterpiece
Now for the grand finale! Carefully pour that hot, gooey topping all over the poked cake. Try to spread it evenly so every piece gets a good amount of that nutty, sweet goodness. This cake is absolutely divine when it’s still warm from the oven, but honestly, it’s also fantastic at room temperature or even chilled. It really depends on what you’re craving!

Tips for Achieving Restaurant-Quality Cakes at Home
Want to really make your cake shine like it came from a fancy bakery? It’s all about those little details! First off, using good quality ingredients makes a HUGE difference. Fresh eggs, real butter, and good vanilla extract are non-negotiable. And when it comes to toasting your nuts for the topping? Trust me, it’s a step you don’t want to skip – it brings out this incredible depth of flavor that’s just chefs’ kiss! When you’re making that topping, really watch that butter. Browning it perfectly is key to that caramelly flavor you find in the best desserts. Oh, and for presentation? A little sprinkle of extra toasted pecans or a dusting of powdered sugar can really make it look extra special, just like you see on my about page – it’s all about that visual appeal!
Ingredient Notes and Substitutions for Your Cake
Let’s chat about some of the stars of this show! That crushed pineapple? It’s not just for flavor; it brings a fantastic moistness to the cake, and you really don’t want to drain it. All that juice adds to the magic! If you’re not a pecan fan, or maybe you just don’t have them on hand, walnuts are a brilliant swap for the topping. They give a similar nutty crunch. Also, if you ever need to make this a bit quicker, using pre-chopped nuts is totally fine, though toasting them yourself really kicks up the flavor! For the coconut, make sure it’s sweetened flaked coconut; it adds just the right sweetness and texture. You can always peek at my contact page if you have more questions!
Frequently Asked Questions About Restaurant-Style Cake Ideas Recipes at Home (2025)
Got questions about whipping up these amazing Restaurant-Style Cake Ideas Recipes at Home (2025)? I’ve got answers right here!
Can I make this cake ahead of time?
Oh, absolutely! This cake is actually a bit better if it has time to chill. Pop it in the fridge after it cools down for the best flavor. It’s one of those desserts that gets even better with a little rest.
What kind of pan is best for this recipe?
A 13×9-inch metal baking pan is your best bet. It helps the cake bake nice and evenly, which is super important for getting that gooey topping distributed just right. Just make sure it’s metal, as it conducts heat better for this kind of cake.
How do I know when the topping is cooked correctly?
You’ll know the topping is cooked perfectly when the butter has turned a beautiful nutty brown color and smells heavenly, and the sauce has thickened just a touch. Keep a close eye on it; it can go from perfect to burnt pretty quickly!
Estimated Nutritional Information
Just a friendly heads-up, the nutritional info for this cake can vary quite a bit depending on the brands you use and exactly how you measure things. But, as a ballpark, each serving is roughly around 450-500 calories, with about 20-25g of fat, 60-70g of carbs, and maybe 5g of protein. Remember, these are just estimates for Restaurant-Style Cake Ideas Recipes at Home (2025)!
Share Your Restaurant-Style Cake Creations!
Alright bakers, I want to see what you’ve made! Did you whip up this amazing cake for a special occasion, or just because? Drop a comment below and tell me all about it! And hey, if you share a pic on social media, tag me – I love seeing your Restaurant-Style Cake Ideas Recipes at Home (2025) in action!

Restaurant-Style Cake Ideas Recipes at Home (2025)
Ingredients
Equipment
Method
- Preheat your oven to 350°F. Line a 13 x 9–inch metal baking pan with parchment paper.
- To prepare the cake, whisk together the flour, sugar, baking soda, and salt in a large bowl.
- Make a well in the center of the mixture and crack in the eggs. Whisk the eggs until lightly beaten.
- Add the vanilla and pineapple. Stir until well blended.
- Pour the batter into the prepared pan.
- Bake at 350°F until a wooden pick inserted in the center comes out clean, about 33 to 36 minutes.
- Immediately poke holes all over the cake with the handle of a wooden spoon.
- To prepare the topping, melt the butter in a medium saucepan over medium-high heat. Stir in the salt. Continue cooking, stirring occasionally, until the butter is nutty-fragrant and browned to the color of caramel, about 3 to 4 minutes.
- Stir in the sugar and evaporated milk. Bring to a boil. Reduce heat to medium (or the temperature needed to keep the mixture at a vigorous boil). Cook until slightly thickened, about 3 to 5 minutes.
- Remove the pan from the heat and stir in the pecans, coconut, and vanilla.
- Pour the hot topping over the cake, spreading evenly. Serve the cake warm, at room temperature, or chilled.
Notes
Tried this recipe?
Let us know how it was!
Certified Gluten-Free Culinary Master
Everything changed in 2017 when I received my celiac diagnosis. After ten years as a traditional pastry chef creating elaborate wedding cakes and French pastries, I suddenly couldn’t even taste my own work. It felt like the end of my culinary world.
Instead, it became my greatest challenge. I had to completely relearn baking – understanding how gluten-free flours behave differently, how they bind, how they absorb moisture. Adding the low-carb requirement? That was like solving a puzzle with half the pieces missing.
My breakthrough came with what I now call my “foundation flour blend system” – different combinations that seamlessly replace wheat flour while maintaining low-carb macros. These techniques have been adopted by culinary schools and have helped countless bakers who thought their favorite treats were gone forever.
That first successful batch of gluten-free, low-carb chocolate chip cookies? Watching my husband close his eyes and smile told me I’d found my true calling. Now, with over 300 tested recipes, I prove daily that dietary restrictions don’t mean culinary limitations.
When I’m not experimenting in my Austin test kitchen, I’m teaching weekend workshops or tending my herb garden with Biscuit, my rescue beagle who’s become an expert at detecting oven timers.